Showing posts with label starters. Show all posts

Saturday, August 16, 2014

Murukku / South-Indian Chakli

Murukku is a very popular deep-fried savory snack that's made during festive occasions like weddings, Diwali, and other religious days. Tomorrow is Gokulashtami - Lord Krishna's birthday. So, this is one of the many savory dishes that's made to celebrate the day. 

My husband and I love murukkus, however, these murukkus are made entirely by hand instead of using any equipment to press out the spirals. The prepared dough is slowly spun in a twisted rope-like fashion to make the murukkus, as shown in this video. Now, to do this one needs a special skill and dexterity that I lack! My mom always says this skill is something that you are born with - like the ability to touch your nose with your tongue ;). I have resisted this idea and have tried several times to make these murukkus by hand when I was a teenager, but my success rate has been erratic. I don't want to discourage anyone, though! This is just my limitation. 

So, I have started to make these murukkus using a press. After all, the ingredients are the same, and consequently, the end product tastes the same. If the murukkus are made using a press, they resemble chaklis - another Indian deep-fried equivalent of murukku.

Here's the simple procedure to make murkkus.

Wednesday, August 6, 2014

Aloo Bonda / Batata Vada

When it comes to indulging my husband with food, potatoes feature prominently and repeatedly in the list. I am sure it tops everyone's list! So, there's been a potato fest at our home recently. 

If there's potatoes and a fest, it has to involve something deep-fried. And one of the most popular Indian street-foods that calls for deep frying spicy potatoes has to be aloo bonda, or known as batata vada in Mumbai. How can a food that calls for deep frying spicy balls of potatoes dipped in a thick and tasty batter not be popular on any planet (involving humans)?

Making these vadas at home brings in the pungent and nostalgic smell of hot oil meeting batter and potatoes - an inescapable aroma that's sure to assault your senses if you take a walk down a busy Indian street that clamors with food, lights, colors, sound, and chatter.

Wednesday, July 30, 2014

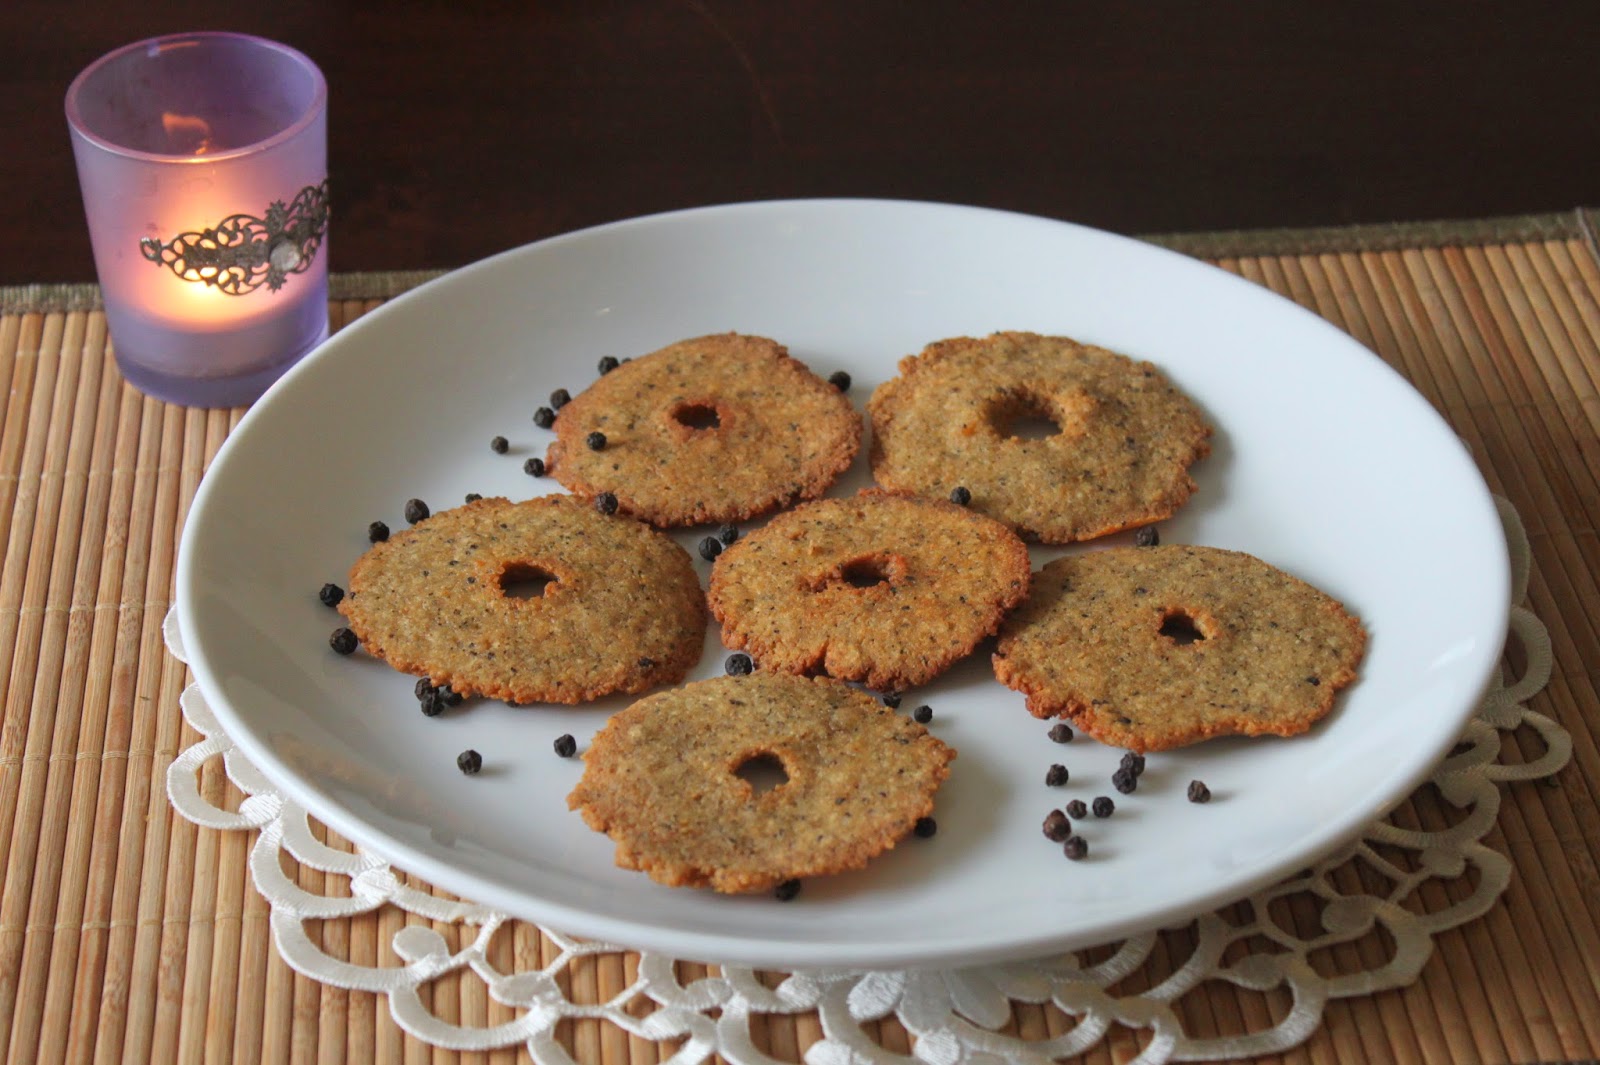
Milagu Vadai / Pepper Vadai (Anjaneyar Vadai)

Milagu vadai is a thin deep-fried disc prepared from coarsely ground whole black gram and lots of cracked black pepper. It is a common religious offering to the Hindu God, Hanuman (also known as Anjaneyar). Ever since I was three years old, I have had a special fascination and reverence towards this particular Hindu God. So, this vadai is a special favorite. I love its simple taste, and the feeling of peace, quite, and hope it evokes.

This is a very simple and easy preparation that takes no time at all to make.


Wednesday, July 9, 2014

Olive Tapenade

Tapenade, a chunky topping to spread on crusty bread, is a very common Italian/Mediterranean French starter. Although its origin is French, the ingredients in it make it a common starter in Italian and Mediterranean restaurants. A while ago, we took my parents to an Italian restaurant, fingers crossed hoping they would like at least some of the dishes and the overall experience. This was before they had even tried pesto, so I wasn't sure what to expect from them. But, I have been pleasantly surprised at how well they are taking to different cuisines! I am impressed and proud that they are open to trying everything (even sloppy burgers), and find something to like and relate with every cuisine. At the Italian place, my mom loved the complimentary olive tapenade! She raved about it and said it tasted very similar to raw mango. So, this week, I thought of making some simple olive tapenade at home. 

Tapenades, especially olive tapenades are extremely easy to make. It involves just grinding olives and a few ingredients along with olive oil. So, here it is.


Thursday, July 3, 2014

Peanut and Avocado Salad

This is a refreshing and nutritious salad with all the fixings to make a wholesome and filling snack or starter. 

Peanuts are full of protein, but are under utilized in our cooking. They are often used to season desserts or dishes, but are hardly used in the same manner as chickpeas or kidney beans are. 

While scrounging around for what to make for an evening snack, I started with the idea of making peanut sundal, and before I realized it, I was on a completely different course. Thankfully, the end result was liked by the family, so it was a fruitful diversion!


Friday, April 11, 2014

Mysore Bonda / Ulundu Bonda

Bondas are flavorful, deep fried fritters. Mysore bondas are popular for their distinct flavor and inviting rotund shape. Many prepare bondas with all-purpose flour (maida) and a little rice flour mixed with yogurt or buttermilk to make a fluffy batter that rises and puffs when fried. The addition of baking soda makes the bondas all the more round and puffy!

In contrast, this is another version that is prepared with black gram (ulundu). It is very similar to making medhu vadai, except this bonda is tempered with several seasonings.

When my husband heard that his mom recently made these bondas, he couldn't get them out of his mind :). So, here they are!

Thursday, March 27, 2014

Avocado & Radish Mini Tartines

Our friends TK and Sindhu gave me this wonderful book by Clotilde Dusoulier as a gift. Right after the book was published, it was on my Amazon wishlist. So it was a delightful coincidence when I received it as a gift! Thanks to them for knowing me so well :). 

I've been trying out the recipes in the book, and they are all fantastic. The recipes defy the common notions and misunderstandings surrounding French cuisine. None of the recipes are high-brow or daunting. The book is a collection of healthy recipes based on fresh seasonal produce, and they are all accessible and easy to prepare. It's yet another testament to how simple ingredients and tasteful, minimalistic seasonings pair together to make amazingly delicious dishes. Although there are some ingredients that are perhaps a little hard to find in common stores, Clotilde makes sure to suggest substitutions and alternatives. 

Anyway, when my friends visited last week, I decided to make a three course simple meal from the book.

Starting with this appetizer, I adapted the recipe from the book, and thanks to TK's feedback and suggestions, it was improvised further for an addictive and incredibly easy finger food! 


Monday, February 3, 2014

Pan-Fried Samosas

No Indian party is complete without samosas. It is a staple in almost every fun gathering. Crunchy, buttery pockets of pastry hold a delicately spiced stuffing of potatoes and peas. The soft stuffing perfectly complements the crispy shell.

Obviously, deep frying is the best method of preparing samosas. Nothing beats it. However, in the interest of making them less oily, I have pan fried them. In the past, I have tried baking the samosas instead of pan frying, but they didn't come out well. The samosas didn't cook evenly and the shell was hard. So, pan frying is the second best option. 

And, of course, this is just my version of making samosas - mini samosas. The original version of folding the dough to make the pockets to hold the stuffing is different from my "short cut" version. But, this is a decent short-cut. If you prefer, please deep fry and enjoy a better tasting samosa!


The steps (makes about 15-16 samosas, depending on the size of the samosas)

The dough:
  1. 1.5 cups maida / all purpose flour
  2. 1.5 tablespoons ghee / clarified butter (or use butter)
  3. 1/2 cup buttermilk / diluted yogurt
  4. 1 teaspoon salt or as needed
In a wide bowl, mix salt and all-purpose flour. Add ghee and mix it in. Slowly add the buttermilk / diluted yogurt and knead the dough until it comes together as a soft and pliable mass. If needed, sprinkle a little water. I usually add buttermilk/yogurt/whey to make rotis and I find a distinct difference in how soft the rotis turn out. Since the samosas are not deep fried, it is important that they turn out soft and not hard and brittle while pan frying. And yogurt comes to the rescue to ensure the samosas are soft. If you prefer, add 1/4 cup water and 1/4 cup yogurt/buttermilk. Cover the prepared dough with a damp cloth and let it rest for 15-20 minutes.

the prepared dough


The filling (some filling - up to 1/2 cup will be left over):
  1. 2 potatoes, boiled, peeled, and crumbled 
  2. 1 onion, sliced
  3. 2 tablespoons oil
  4. 1/2 teaspoon black mustard seeds
  5. 1/2 teaspoon jeera / cumin seeds
  6. 2 green chillies, chopped
  7. 3 cloves of garlic, minced
  8. 1 teaspoon minced ginger
  9. 1/2 teaspoon turmeric powder
  10. 1.5 teaspoons garam masala / vegetable sabzi masala 
  11. 1/3 cup peas (thawed, if using frozen)
  12. 1 teaspoon salt
  13. 2 teaspoons dried mint leaves (optional)
  14. 1 teaspoon of lemon juice
  15. 1/4 cup coriander leaves / cilantro
Preparing the filling:
  1. Heat oil in a pan. When hot, splutter mustard seeds, and add jeera. When jeera begins to sizzle, add ginger, green chillies, and onion and saute until onion begins to brown slightly. 
  2. Add garlic and fry for 1 minute. 
  3. Add turmeric powder and mix
  4. Add the crumbled potatoes and mix them well. Fry for 5 minutes. 
  5. Add garam masala and peas and give a mix
  6. When peas are cooked, remove from heat.
  7. Throw in dried mint leaves, coriander leaves and lemon juice and mix. Let filling cool.
 Making the samosas:
  1. Pinch out and make about 7-8 balls from the prepared dough. Cover the balls/dough with a damp cloth or paper towel, so that they remain soft and don't form a crust. 
  2. Roll out each ball into an evenly thin circle, so that the samosa cooks evenly (dust the rolling board/pin with all-purpose flour to avoid the dough from sticking). Cut the circle in the middle to make two semi-circles. 
  3. Gently roll each semicircle along the curve to connect either sides and make a wide conical shape (just as you would roll a piece of paper to make a cone). Use water to seal the edges. Fill the pocket/the "cone" with the stuffing. Gently push the stuffing to the bottom using your finger and continue filling until the top. Then fold down the "flap" at the top to cover the filling. Use water to seal the flap. Hopefully the pictures below help visualize the process. If you don't want to go through all the trouble to make these pockets, just place the filling in the corner of a small circle of rolled out dough and close to make a crescent. Otherwise, cut out squares of the rolled out dough, place filling on one side, and connect the diagonals to form triangles. My samosas are anyway distant cousins to triangles and cones, so the shapes don't really matter! Just stuff any which way and fry!
Once all the "samosas" are stuffed, pan fry them. Cover all the prepared stuffed samosas with a damp cloth. For each batch, use about a teaspoon of oil in a pan and fry the samosas on both sides until golden brown. 

Things to keep in mind while frying:
1. First heat the oil on medium heat. When hot, start frying the samosas. Soon the pan would get too hot, causing the outside of the samosas to crisp up fast, leaving the insides of the dough raw. So, reduce the heat slightly in about 10 minutes time to ensure the samosas cook through and crisp up.
2. Gently press down on the samosas to help all the edges fry and cook evenly. Otherwise, the center of the samosas will brown and crisp, while the edges wouldn't even touch the pan and will remain raw.


Serve hot with ketchup or spicy mint-coriander chutney.

Sunday, February 2, 2014

Baked Sweet Potato Fries

Superbowl finger food this time - Sweet Potato Fries and pan-fried Samosas! Both my husband and I LOVE sweet potato fries. We can't seem to get enough of them. They are so incredibly addictive. After a few lukewarm attempts where my fries were either too caramelized or just a little limp or lacking in flavor, I finally hit upon a combination of spices and bake time that seems to work. This version of the fries is sweet and spicy. I also added some brown sugar to bring out some extra camerlization action!

So, here it is!

Ingredients (serves 4):
  1. 2 sweet potatoes, peeled and cut into wedges about 3/4 - 1 inch wide
  2. 1.5 tablespoons corn starch
  3. 1 teaspoon salt
  4. 1 teaspoon freshly cracked black pepper
  5. 2 teaspoons brown sugar
  6. 1/2 teaspoon amchur / dry mango powder
  7. 1 teaspoon chaat masala
  8. 1.5 teaspoons cumin powder / jeera powder
  9. 1 + 2 tablespoons olive oil
Coated with spices and ready to bake!
Preparation:
  1. Preheat the oven to 425 F
  2. In a big enough zip lock bag, throw in the sweet potatoes and corn starch. Seal the bag and give it a good shake until all the wedges are coated with corn starch. This makes the fries slightly more crispier.
  3. Next, add the remaining spices - salt, pepper, brown sugar, amchur, chaat masala, and cumin powder.  Lastly pour 2 tablespoons of oil into the bag. Seal the bag and toss the wedges and massage them so that they get coated with all the spices. 
  4. When all the wedges look evenly coated, transfer them to a baking sheet and bake for 15 - 20 minutes on one side (I recommend 17 minutes :)). Now, flip the wedges onto the other side, drizzle a tablespoon of oil and bake for another 20 minutes or until the wedges are sufficiently browned/caramelized.
That's it. Remove from the oven and serve immediately.

Sunday, January 19, 2014

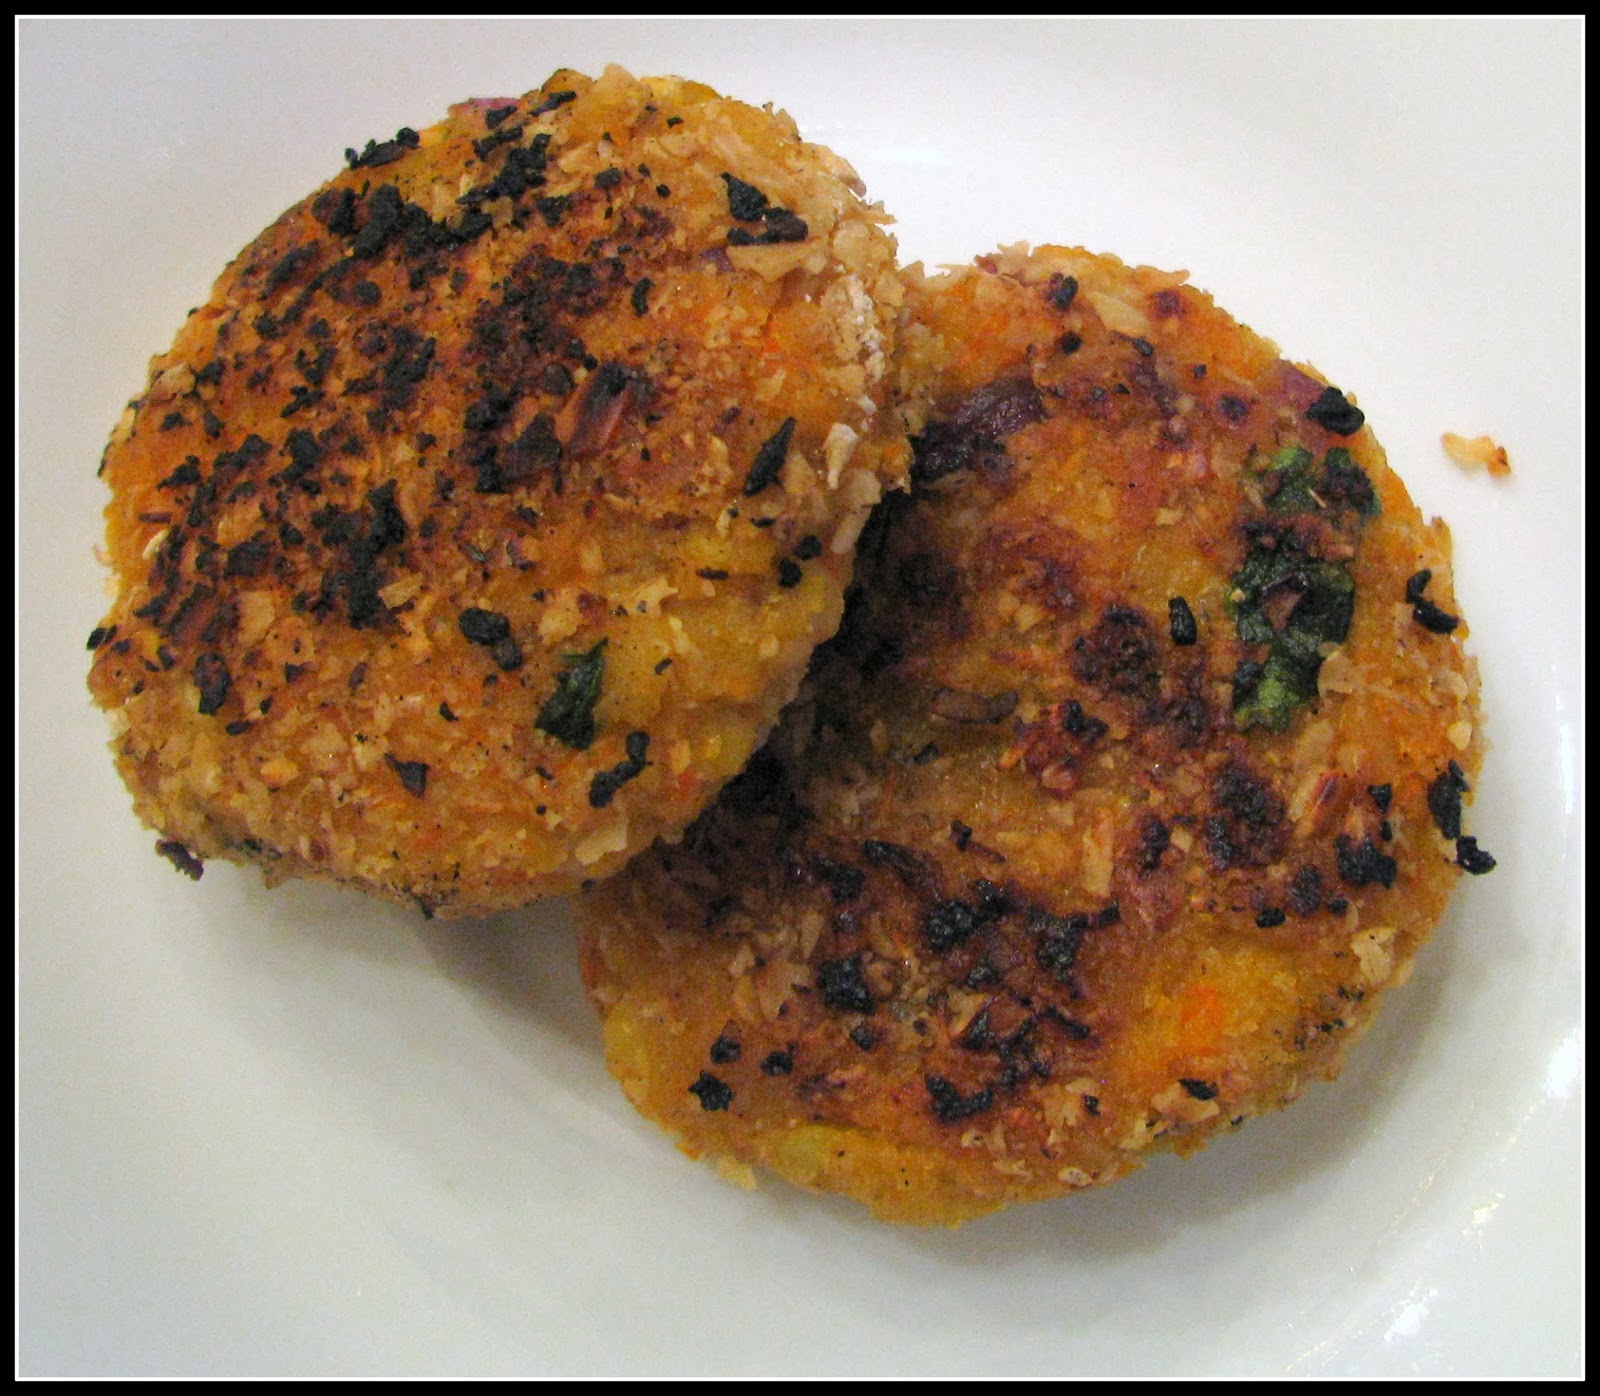
Moong Dhal Tikki / Mung Bean Tikki

Tikki or cutlets are deep-fried/pan fried spicy patties. They are popularly prepared with mashed potatoes and Indian spices and are called Aloo Tikkis. The fried potato patties are as popular as Samosas are as party and tea-time appetizers in India.

I never would have thought to make tikkis with lentils or dhal (although now that I think about it, it is like making masala burgers!), until I came across a lovely recipe that used moong dhal instead of potatoes, and oats instead of bread crumbs to crisp the tikkis. And after trying, tasting and testing the tikkis on friends, I can say that nobody could guess that the tikkis were made with plain old dhal and not potatoes! They taste really good, are healthier than potato tikkis and are perfect as an appetizer that doesn't allow guilt to creep in.


Adapted and tweaked from this recipe
Ingredients (serves 4):
  1. 1/3 cup uncooked moong dhal /payatham paruppu / yellow mung beans
  2. 1 cup oats
  3. 1/2 a medium-large red onion, finely chopped
  4. 1 teaspoon minced ginger
  5. 1 green chilly, finely chopped
  6. 1 teaspoon coriander powder
  7. 1 teaspoon garam masala or pav bhaaji masala
  8. 1/2 teaspoon turmeric powder
  9. 4 tablespoons (and a few extra teaspoons) vegetable oil, or as needed
  10. 1/4 chopped coriander leaves / cilantro
  11. 1/4 - 1/3 cup buttermilk or diluted yogurt (as needed)
  12. 1.5 teaspoons salt or as needed
Preparation:
  1. Cook the moong dhal with just enough water to complete cook the dhal until mushy. If there is any extra water, drain it from the cooked dhal and let it cool. When cool, pulse in a blender until the dhal is broken down. Do not add any water.
  2. Grind 1/2 cup of oats. Add this to the cooked & pulsed dhal along with chopped onion, ginger, green chilly, garam masala/other masala, turmeric powder, salt, and coriander leaves and mix everything well. Try to form small discs/patties that hold together. If you are unable to form patties, grind some more oats and add to the mixture until you can form patties. 
  3. Create an assembly line to pan fry the patties/tikkis. Heat a teaspoon of oil in a skillet (cast-iron ideally). Dip the patties in buttermilk/yogurt, roll it around in the remaining 1/2 cup of oats that is coarsely ground (just pulse a couple of times in the blender) and pan fry on either sides until golden brown. Replenish the skillet with oil and pan fry all the patties. Note: for most of the tikkis, I didn't need to dip in buttermilk/yogurt to coat them in coarsely ground oats. The patties were moist enough by themselves for the oats to attach to their exterior. So, dip in buttermilk/yogurt if required.
  4. Remove and drain on paper towels. Keep the fried patties in a warm oven (200 F or less) until ready to serve. 

Serve with tomato ketchup or a favorite sauce of your choice. 

Wednesday, January 15, 2014

Vegetable Manchurian

During the crazy Arctic freeze and blizzard of last week when everyone was huddled indoors, I took a break to make these manchurians. Usually, a gloomy weather is an excuse for making fried foods such as bajji and pakoda. They warm you up and make you forget the calories for a while. Since my husband had been asking for manchurians lately (and since I love them too), I decided to try and make some.

This is just my mish-mash version of machurians. Manchurians are popular in India and are hailed as Indo-Chinese delicacies. However, most Chinese people don't regard Manchurians as Chinese food. It has some soy sauce and Chinese chilli sauce in it, so perhaps that's why it's referred as Indo-Chinese. 

So what are manchurians, you might ask. They are crispy fried nuggets of vegetables (popularly cauliflower florets) that's tossed in a spicy and flavorful Asian sauce consisting of soy sauce, ginger, garlic, brown sugar, tomato sauce, chilli sauce and scallions. They make extremely addictive appetizers and finger foods. 

I added no heat to this version. No chillies, no chilli sauce, because we are not fans of heat. Plus, I didn't have any chillies or chilli sauce... and venturing out to get them in a polar blizzard didn't seem wise. So add as many chillies as you would like, if you decide to try this recipe. The manchurians were flavorful for sure and tasted quite close to the real deal.

Ingredients (serves 2):

For the manchurians (makes 14)
  1. 1 cup shredded cabbage
  2. 1 green bell-pepper, finely chopped (comes to 1 cup)
  3. 2 tablespoons besan / kadalai maavu / bengal gram dhal flour
  4. 3 tablespoon rice flour
  5. 1 teaspoon soy sauce
  6. 1 teaspoon salt or as needed
  7. 1 teaspoon pepper
  8. 1 tablespoon of equal proportion of minced garlic and ginger
  9. 1 tablespoon chopped scallions 
  10. 4-5 cups vegetable oil for deep frying
the manchurians seem really dark because I used purple cabbage
For the Sauce
  1. 2 tablespoons sesame oil
  2. 3 pods of garlic, minced
  3. 1 teaspoon minced ginger
  4. 1/4 of a medium red onion, minced
  5.  3 tablespoons tomato ketchup
  6. 1 tablespoon soy sauce
  7. 2 teaspoons vinegar / rice wine vinegar
  8. 1.5 teaspoons honey
  9. salt as needed (be wary of the soy sauce)
  10. Some coriander leaves/cilantro for garnish
Dipped in sauce
  Preparation:
  1.  In a bowl, mix the cabbage, bell pepper, ginger, garlic, scallions, salt and pepper. Add soy sauce and mix. Add besan, rice flour and all-purpose flour and mix. The addition of flour should enable you to make small fritter sized balls that hold shape and form. If you are unable to form balls, sprinkle some more besan or rice flour and try again. Adding rice flour makes the manchurians crispy. (note: I did not drain water from the vegetables, especially the cabbage)
  2. Form balls and deep fry them to golden brown. Fry them on medium heat making sure the outside doesn't fry before the insides are cooked. That is, slowly fry them to a golden brown. Drain on paper towels. 
  3. Make the sauce.
    1. Heat sesame oil and add onion and saute until they are translucent. 
    2. Add garlic and ginger and fry on medium heat for a minute or two. Remove from heat.
    3. In a bowl, whisk together - tomato ketchup, soy sauce, honey, vinger and salt (if needed). 
    4. Add the sauted onion, garlic, ginger (along with any sesame oil in the pan) to the sauce and mix well. 
  4. Now, take each manchurian and dip/roll it in the sauce and take out. After repeating this for each manchurian, pour the remaining sauce evenly on the manchurians and serve with a garnish of coriander leaves and scallions (if you have any). 
Serve immediately. You can carefully skewer each manchurian on a tooth pick and lay them out as finger food. Enjoy before the manchurians become soft!

Thursday, January 9, 2014

Zucchini Mini Pizza

I recently had zucchini lasagna at a restaurant and was pleasantly surprised at how well zucchini complemented the flavors of marinara and cheese. So, on a day when I had to make some quick appetizers, I worked with the ingredients on hand to put together something like mini pizza.


Ingredients (makes around 20):
  1. 1 zucchini, sliced into 1/4 inch slices
  2. 1/2 cup tomato/ marinara sauce
  3. 1/4 cup grated parmesan or mozzarella
  4. a few tablespoons of extra virgin olive oil
  5. salt as needed
  6. cracked black pepper as needed
Preparation:
  1. Brush some olive oil on the zucchini slices and arrange them on a baking tray.
  2. Bake for 5 minutes in a preheated 400 F oven. Flip the zucchinis and bake them for another 2 minutes
  3. Spread some tomato sauce on each zucchini slice. Sprinkle with some cheese (I used parmesan), salt (if needed; i.e., if your sauce is not salted) and black pepper. 
  4. Put the zucchinis back in the oven and bake for 2 minutes or until the parmesan slightly melts.
Serve immediately as finger food. This is a pretty addictive appetizer that was well received. 

I didn't have any basil on hand, but if you do, you could sprinkle some torn basil leaves or crushed oregano too.

Wednesday, March 27, 2013

Quinoa Cutlets / Quinoa Patties

The last post on vegetable cutlets serves as a nice segue for this particular recipe. Quinoa is the current coolest ingredient in everybody's pantry. It tastes good, is healthy, and can be easily incorporated as a substitute for rice in Indian cooking. Last week, I came across this recipe for quinoa cakes and I was immediately inspired to try it at home. So, here is my adapted version of quinoa cutlets. If I didn't tell you what the main ingredient in the cutlet was, you would never guess (in a blind taste-test, of course). It tastes very much like potato-veggie cutlet!


Ingredients:
  1. 3 cups cooked  quinoa (cook quinoa as you would rice with 2 cups of water per cup of quinoa)
  2. 4.5 tablespoons yogurt
  3. 1 medium-sized onion, finely chopped
  4. 3 cloves of garlic, minced
  5. 1 cup green peas, almost cooked
  6. 1 teaspoon of salt (or depending on taste)
  7. 1 teaspoon turmeric powder
  8. 1 teaspoon curry powder / garam masala powder
  9. 1/3 cup parmesan cheese, grated
  10. 1/4 cup finely chopped coriander leaves / cilantro
  11. 2 - 3 cups bread crumbs
  12. a few tablespoons olive oil for shallow frying
Preparation:
  1. In a large bowl, add the cooked (and cooled) quinoa. Fluff it up slightly with a fork. Add yogurt and mix well. The yogurt acts as a binding agent and can be added as a substitute to eggs. 
  2. Next, add the spices - turmeric, curry powder / garam masala powder, and salt. Mix well. 
  3. Mix in the chopped onion, garlic, and peas. 
  4. Gently stir in the cheese and coriander leaves
  5. Finally add 1 cup of bread crumbs and stir well. The breadcrumbs also acts as a binding agent. Let the mixture rest for 15 minutes and then touch it to see if it's moist. If it's moist, add some breadcrumbs until you can make patties that hold their shape. I tired a batch without adding breadcrumbs to the mixture and they didn't hold their shape while frying/serving. So, do not ignore this step.
  6. Once the mixture is ready, prepare to shallow fry 
    • Prepare 1/2 inch - 1 inch thick patties
    • Coat the top and bottom of the patties in breadcrumbs 
    • Heat 1.5 - 2 tablespoons of oil in a shallow frying pan. When hot, place 4-5 patties in the pan and fry on medium heat for 5-7 minutes until the bottom is golden brown/crisp. Gently flip the patties and crisp the other side. Remove and drain on paper towels.
    • Replenish the pan with a little more oil and repeat forming and frying the patties. 

 Serve with ketchup/chutney of your choice. They are obviously best had when hot and right from the pan. And a few cutlets also serve as a filling meal.

Sunday, March 24, 2013

Vegetable Cutlets / Vegetable Patties

This week’s resolution is to try and write up some of the many pending backlogs of dishes prepared more than a year ago. The TBW folder is growing tired of my additions, and I’m afraid I’ll forget the recipe or even what the pictures represent. For instance, I glanced by one of the below pictures and briefly wondered what it was.


Anyway, here is my take on a very common and popular appetizer - vegetable cutlets. Boiled, mashed potatoes form the main ingredient here. It is spiced and mixed with other cooked vegetables, made into patties, coated with breadcrumbs and deep fried! How can it not taste good. Since everyone is paranoid of deep-frying these days, I tried shallow frying the cutlets on a wide and shallow frying pan. It consumes far less oil and tastes almost as good as deep frying.


Ingredients (serves 4 hungry people):
  1. 4 medium-sized boiled potatoes, peeled and mashed
  2. 1 - 1.5 cups worth mixed vegetables - finely chopped carrots, beans, bell-pepper, corn, and green peas
  3. 1 onion, finely chopped
  4. 1 teaspoon grated ginger
  5. 1 teaspoon fennel seeds
  6. ½ teaspoon cumin seeds
  7. 1 teaspoon turmeric powder
  8. 1 teaspoon coriander powder
  9. ½ teaspoon chilli powder
  10. 1.5 teaspoons pav bhaji masala / garam masala
  11. 1.25 teaspoons salt or as needed
  12. ¼ cup coriander leaves / cilantro
  13. juice of half a lemon
  14. 2 cups (or more) bread crumbs
  15. 3 tablespoons yogurt
  16. A few tablespoons of vegetable oil (for shallow frying)

Preparation:

  1. Boil the potatoes, peel them and mash them as best as you can (no need for a fancy gadget) and set aside.
  2. Heat 2 tablespoons of oil on medium heat. Add fennel seeds and cumin seeds and wait for them to sizzle. When they do, add the onions and saute till they turn translucent. Next, add the grated ginger and fry for a few seconds.
  3. Next add the turmeric powder, chilli powder, coriander powder and pav bhaji / garam masala and fry for a few seconds. Be careful not to let the spices burn.
  4. Add the chopped vegetables and salt saute on medium heat for 5 minutes. Then, with the lid closed, continue to cook the vegetables until they are tender and almost cooked.
  5. Add the cooked and spiced vegetables to the mashed potatoes and using your hand (or a good spatula) mix  everything together.  Taste and adjust for seasonings. Finally, add some chopped cilantro and some lemon juice and give it another gentle mix.
  6. Heat two tablespoons of oil in a shallow and wide frying pan. As the oil heats, assemble the following:
    1. Dilute the yogurt in ⅓  cup of water and whisk well. Pour it into a wide cup
    2. Spread the bread crumbs onto a plate
    3. Start making 1/2 - 1 inch thick patties (discs) of the prepared vegetable mixture. Wet your hand with a little water or oil if the patties stick.
  7. Test if the oil is hot by dropping a small amount of the vegetable mixture. If it begins frying, it’s ready. Maintain the temperature at medium-low to medium.
  8. Start shallow frying the patties:
    1. This step is optional. If your patty is already moist because of the potatoes, just roll them in the bread crumbs. Else, gently dip the front and back of the patty in the diluted yogurt. Do not dunk it, gently coat the sides with the yogurt to wet the patty so that the bread crumbs stick to it.  The patty should not be dripping wet and sloppy, it should just be made moist.
    2. Roll the patty in the bread crumbs and dust off the excess crumbs, if any.
    3. Place the patty on the hot oil and fry each side for about 5-7 minutes or until crisp and golden brown. Do not overcrowd the pan, fry no more than 4 patties at a time. Gently flip them to evenly fry both sides. If needed, add a teaspoon of oil to each batch so that the patties don’t burn.
    4. Drain the fried patties/cutlets on paper towels and serve hot.

If you are not a fan of even shallow frying the cutlets, then you can alternatively bake them. I have tried baking them a few times, but I have to say that they (obviously) don’t taste as good as frying. For one, they  somehow seem longer to prepare and the bread crumbs (along the circumference of the cutlets) remain raw. But if you would like to bake, here’s what you need to do:

  1. Pre-heat the oven at 425 F. Wrap a sheet tray with aluminum foil. Place the prepared patties (coated in some diluted yogurt and bread crumbs only on the front and back) on the sheet tray.
  2. If you want, you can drop ¼  teaspoon of oil on top of each patty so they crisp well. Else, just place them in the center of the oven and bake for 20-25 minutes until one of the sides is browned. Then gently flip all the patties, add a bit of oil on each patty (optional), and bake for another 10-20 minutes until the other side is also browned.


As you can tell from the pictures, I used very little oil to pan fry the cutlets, so the crumbs are not evenly and completely golden brown. But they still taste good.

These cutlets go well with tomato ketchup and any spicy, tangy dip.

Tuesday, March 19, 2013

Kunukku

Kunukku is a deep fried nugget of spiced lentils and rice. It's kind of like vadai, but the proporition of ingredients are slightly different. Usually, left over vadai batter is utilized to make kunukku. It's crunchy, crispy, and an easy to prepare fritter/starter. 


 Ingredients:

  1. ½ cup kadala paruppu / bengal gram dhal
  2. ½ cup thuvaram paruppu / thoor dhal
  3. ¼ cup rice
  4. ¼ cup ulutham paruppu / split black gram dhal
  5. 2-3 dry red chillies
  6. 1 teaspoon salt, or according to taste
  7. ¼ teaspoon hing / asafoetida
  8. about 4 cups vegetable oil
  9. some curry leaves

Preparation:
  1. Soak the bengal gram dhal, thoor dhal, split black gram dhal, rice, and red chillies for 1 hour. Strain the water and coarsely grind everything with about 2 tablespoons of water (or slightly more if needed) to prepare the batter. The batter's consistency should be the same as vadai batter - thick and moist. A slightly coarse batter would result in crispy fritters. 
  2. To the batter, mix hing, salt, and curry leaves. 
  3. Heat oil in a cast-iron pot on medium-high heat. Check if the oil is hot by dropping a little bit of batter. If it immediately sizzles and rises to the top, the oil is hot. Maintain the oil temperature by adjusting the heat between medium and medium-high. 
  4. Pick up small nuggets of the batter and drop carefully into the oil. Do not overcrowd the pot with more than 5 kunukkus. Fry until crispy and golden brown. 
  5. Remove the kunukkus and drain on paper towels. 
 Serve with ketchup or sauce. Just the plain crispy kunukkus is great with tea/coffee.  
 

Saturday, February 4, 2012

Vegetable Puffs

All of us who grew up in India have a special love for vegetable puffs - especially the super soft and flaky ones from the ubiquitous “Iyengar Bakery”. I never ever imagined that I would be able to recreate the awesome puffs in my very own home. But, thanks to my good friend Priya, I was taught how to. I was thrilled when Priya mentioned that I could just buy the puff-pastry sheets and make my own version of vegetable puffs at home! I was even more amazed at how well the puffs turned out. Most of the technique, difficulty and skill involved in preparing the puffs depends on the quality of the pastry dough. So, life is simplified infinitely by just using the good quality store-bought dough/sheet. The vegetable stuffing is just a spicy curry of your own liking.

Ingredients:
  1. Pepperidge Farm Puff Pasty sheets (or any store bought puff pastry sheet)
  2. For the vegetable stuffing:
    1. 1 teaspoon fennel seeds
    2. 1.5 teaspoons of olive/vegetable oil
    3. 1 onion - finely diced
    4. 2 cups of diced vegetables (beans, carrots, peas, corns, etc.)
    5. 2 boiled potatoes - crumbled or gently mashed
    6. 1.5 teaspoons garam masala
    7. 1 teaspoon salt
    8. juice of half a lemon
    9. ¼ cup of coriander leaves - finely cut.
Preparation:
  1. Thaw the puff pastry sheets - place them at room temperature for 45 minutes or so. Or microwave them in 15 second intervals until the sheets soften just a bit.
  2. Prepare the vegetable stuffing. Heat a teaspoon of oil. Add fennel seeds and let the seeds flavor the oil for 20 seconds. Add the diced onions and saute for 10 minutes until the onions turn translucent. Add the boiled potatoes (crumbled or cut into small pieces) and mix with the onions for a couple of minutes. Then, add the other vegetables and salt and cook for 10 minutes with lid on.
  3. Add the garam masala to the vegetables and mix well. Continue to cook for another 5 minutes. When the vegetables are almost cooked, remove from heat. Don’t completely cook or overcook the vegetables as they are going to bake and continue to cook in the oven. Add lemon juice and coriander leaves to the prepared curry and mix well.
  4. Each puff pastry sheet can be divided into 3 equal parts (the sheet is usually pre-divided into 3 parts). Each part will be approximately 2 inches in width. With some all-purpose flour to avoid sticking, roll out the ⅓ rd sheet along the width to elongate it to about 3 inches wide.
  5. Spoon some of the cooled vegetable curry along the length of the sheet, giving about ¼-1/2 inch room to fold the sheet. Brush the sides of the sheet with a bit of water, and fold the sheet along its length and seal the edges by gently pressing.
  6. Using a sharp knife, a pizza cutter or a candy cutter, cut the sealed and stuffed sheets into bite-sized pieces. Transfer to a baking sheet lined with parchment paper. In order to get extra flaky, fluffy puffs, chill the unbaked puffs for 10 minutes in the freezer.
  7. Bake at 400 F for 20-25 minutes. 23 minutes is the ideal baking time for me. The Puffs will brown at the edges and puff-up beautifully.
this version of the stuffing doesn't have potatoes - a shame, I know.

The usual procedure to ensure golden-brown pastries is to brush the top of the unbaked puffs with an egg-wash (an egg mixed with a little water or milk), or just a little bit of olive oil. I usually don’t go through this extra step. But, it’s worth it if you would like to display a lovely platter of perfectly golden brown pastries.