Showing posts with label in-law's food. Show all posts

Friday, August 8, 2014

Indian Vegetable Sides: Plantain Podimas

Podimas is a classic and unique vegetable side prepared by South-Indians. I am sure it is called by different names, but Brahmins call it Podimas, perhaps because the cooked starchy vegetable is shredded and spiced with a simple combination of ginger, green chillies, turmeric, coconut, and lemon juice. 

Podimas can be prepared with potatoes as well (in the case of potatoes, instead of shredding, just gently crumble the cooked potatoes and follow the same procedure), and other starchy vegetables.

Podimas finds its way on plates and festive banana leaves during special occasions, but it's so easy to prepare that it can easily be a regular vegetable side to feature with simple home cooked food.


Friday, July 25, 2014

Indian Vegetable Sides: Beans with Moong Dal

I often get asked how Indians cook their vegetables for sides. Do we add them to the spicy tomato-onion gravy served at restaurants? Do we roast them? Blanch them? Steam them? Saute them? Stir-fry them? What spices and ingredients go into them? etc.

So, I am going to be posting some basic recipes on the different ways we prepare vegetable sides. Since, I am most familiar with South-Indian cuisine, most of my vegetable sides are derived/based on that cuisine. 

Here's a very common and simple vegetable side that we prepare with minimal spices/seasonings. In this version, green beans are cooked with some moong dal (mung beans) for a tasty and healthy vegetable side that truly showcases the inherent flavor of the vegetable without the distraction of strong spices and smells.

You can use the same procedure to cook other vegetables such as cabbage, carrot, beetroot, cauliflower etc. (basically any non-starchy vegetable that doesn't have too much water content in it so that it can withstand its texture while being cooked with the dal).

Thursday, July 24, 2014

Arachu Vitta Sambar / Sambar with freshly ground spices

Arachu vitta sambar, meaning, sambar made with freshly ground spices, is a slightly special and tastier version of regular sambar (which is a tamarind and lentil stew made with vegetable/s or greens). It is commonly made during festive and special occasions, but in our house, I usually make only this kind of sambar, because it so much more flavorful with just a little extra step. Plus, adding freshly ground spices makes the sambar attain its optimum consistency every single time! It's rich, thick, and a very easy crowd pleaser!

In this recipe, I have added pearl onions and radish/daikon to make this sambar. Pearl onions (chinna vengayam) are a popular choice for this kind of sambar. You can add any (diced) vegetable/s of your choice using this basic procedure. Here's how it's done.


Tuesday, July 22, 2014

Ulutham Sevai / Indian Rice Noodles Spiced with Black Gram

Sevai is a short and delicate rice noodle that's popular in South-India. It takes on the flavor of the seasonings in which it is mixed, so there are many different ways of spicing these noodles. I have been posting some of the more common versions in this space. In this version, the rice noodles are mixed with a simple spiced seasoning made from black gram.

There are also a few different ways of making the rice noodles with either rice batter, or rice flour. I have written about two methods here and here. Today, I am writing about a third method.

This is a method that is very commonly used by most families. My in-laws follow this method, but this requires one to act fast and with skill, because the noodles need to be squeezed out when the cooked rice balls are hot. When they cool down, it becomes hard to squeeze them. This method also works much better using a traditional sevai nazhi made with iron and with a rotating equipment on top to squeeze out the noodles.


Sunday, July 20, 2014

Sevai: Coconut Sevai and Lemon Sevai

Indian rice noodles are called sevai (or idiyappam). In terms of major South-Indian food types, sevai/idiyappam is a prominent category. These rice noodles are thin, delicate strands that are fluffy, airy, and very versatile, because they take on the flavors that you add to them. So there are so many different flavors that can be infused into the noodles, and they all taste good.

If the long strands of coiled noodles are served as such, it is called Idiyappam. When the long strands are broken to short strands and flavored with some seasoning, it is called sevai. Sevai is commonly had during certain religious days when people take a break from regular meals. Idiyappam is an extremely common breakfast food in most parts of South-India, especially in the states of Tamil Nadu and Kerala.

It's amazing that almost every culture has its own version of starchy noodles. The interesting fact about noodles is that it's a great way to economize on raw ingredients. In this case, rice. I find it incredible that home-cooks and women who'd been in kitchens all their lives had the ingenuity to come up with a series of labor-intensive processes to effectively convert rice into noodles. So, this is yet another dish that was on my to-blog list for a really long time. And every time, I put it off because I am hesistant of the manual labor required of this dish.


Wednesday, July 2, 2014

Rava Upma / Semolina Upma

To the few diligent readers of my blog, my apologies for posting so many upma recipes that are far too simple and basic for you! But upmas are such quintessential dishes in the South-Indian community, that in keeping with the main objective of this blog, I think they have to be recorded, however mundane they appear today. After this upma recipe, I promise to not post another upma recipe for a long long time!

Rava upma is considered as the mother of all upmas. It is the most common form of upma that features routinely in South-Indian families. It is often regarded as an easy quick-fix and a pre-evening "tiffin". 

Rava upma is commonly prepared with just onion, but I added broccoli along with onions. You can add any vegetable of your choice. 


Tuesday, June 24, 2014

Karuvepilai Podi / Curry Leaf Spice Blend

Curry leaves are used to season most South-Indian curries, kootus, and gravies. They infuse a distinct curry flavor that is hard to replicate. Curry leaves grow abundantly in tropical climates. So, almost every family grows curry leaves in their yard. One of the ways in which they utilize the surplus leaves is to brew them in coconut oil and sesame oil to make a specialized hair oil to boost hair growth. Another culinary use for curry leaves is through a flavorful spice blend that can be mixed with rice.

So, here's how the spice blend is made!


Monday, June 23, 2014

Yellu Podi / Sesame Spice Blend

Yellu Podi is a spice mix made with sesame seeds and other Indian seasonings. It is smokey, nutty, and flavorful when it is mixed with steamed rice. Simple ingredients go together to make this spice blend that is quite popular in South India.


Tuesday, June 3, 2014

Thengai Podi / Coconut Spice Mix


My mother-in-law prepares this wonderful spice blend with dessicated coconut from the garden. She recently sent a package of this spice blend for us, and I wanted to record the recipe before other things took over. This is my husband's favorite spice blend to mix with steamed rice!

Although this recipe calls for dessicated coconut, you can also use store bought coconut flakes (unsweetened) and roast them well. Shelf-life might be reduced a bit, but store in the fridge in an air-tight container to extend shelf life as much as possible. 


Friday, March 14, 2014

Milagai Podi / Idli & Dosa Podi / Chilli Spice Blend

Milagai podi (chilli spice powder) is used as an accompaniment to idlis, dosas, adais, and other South-Indian crepes. A teaspoon of milagai podi is mixed with some sesame oil to make a slightly thin paste. Pieces of idli/dosa are then dipped into it for a spicy, flavorful bite. It is freshly made at home, with each household having its own slightly unique twist to their recipe. But the basic ingredients are the same. For example, my grandma adds some jaggery to make it more flavorful and palatable for us kids (well, we were kids at least back then). I need to ask my mom for her recipe and record it here sometime.

This recipe is my mother-in-law's. Milagai podi is slightly coarse in texture. It gives a nice crunch, especially when it is had with idli.


Thursday, March 13, 2014

Paruppu Podi / Lentil Spice Blend

Paruppu podi is a Tam-Brahm (Tamizh Brahmin) specialty. It defines minimalism by way of its humble ingredients and simple preparation. When mixed with fresh steaming rice and ghee or sesame oil, it offers a wonderfully comforting and delicious meal. It is what all of us resort to when a quick and flavorful meal needs to be conjured up without any cooking involved. But it is in no way a compromise to have paruppu podi rice. The smell of  spiced roasted lentils hitting warm rice and ghee is one of those unique scent-memories for us Tam-Brahms!

My mother-in-law had sent her recipe to me a few years ago, and I am finally digging it out from my pile of back-log. Here it is! 


Saturday, June 15, 2013

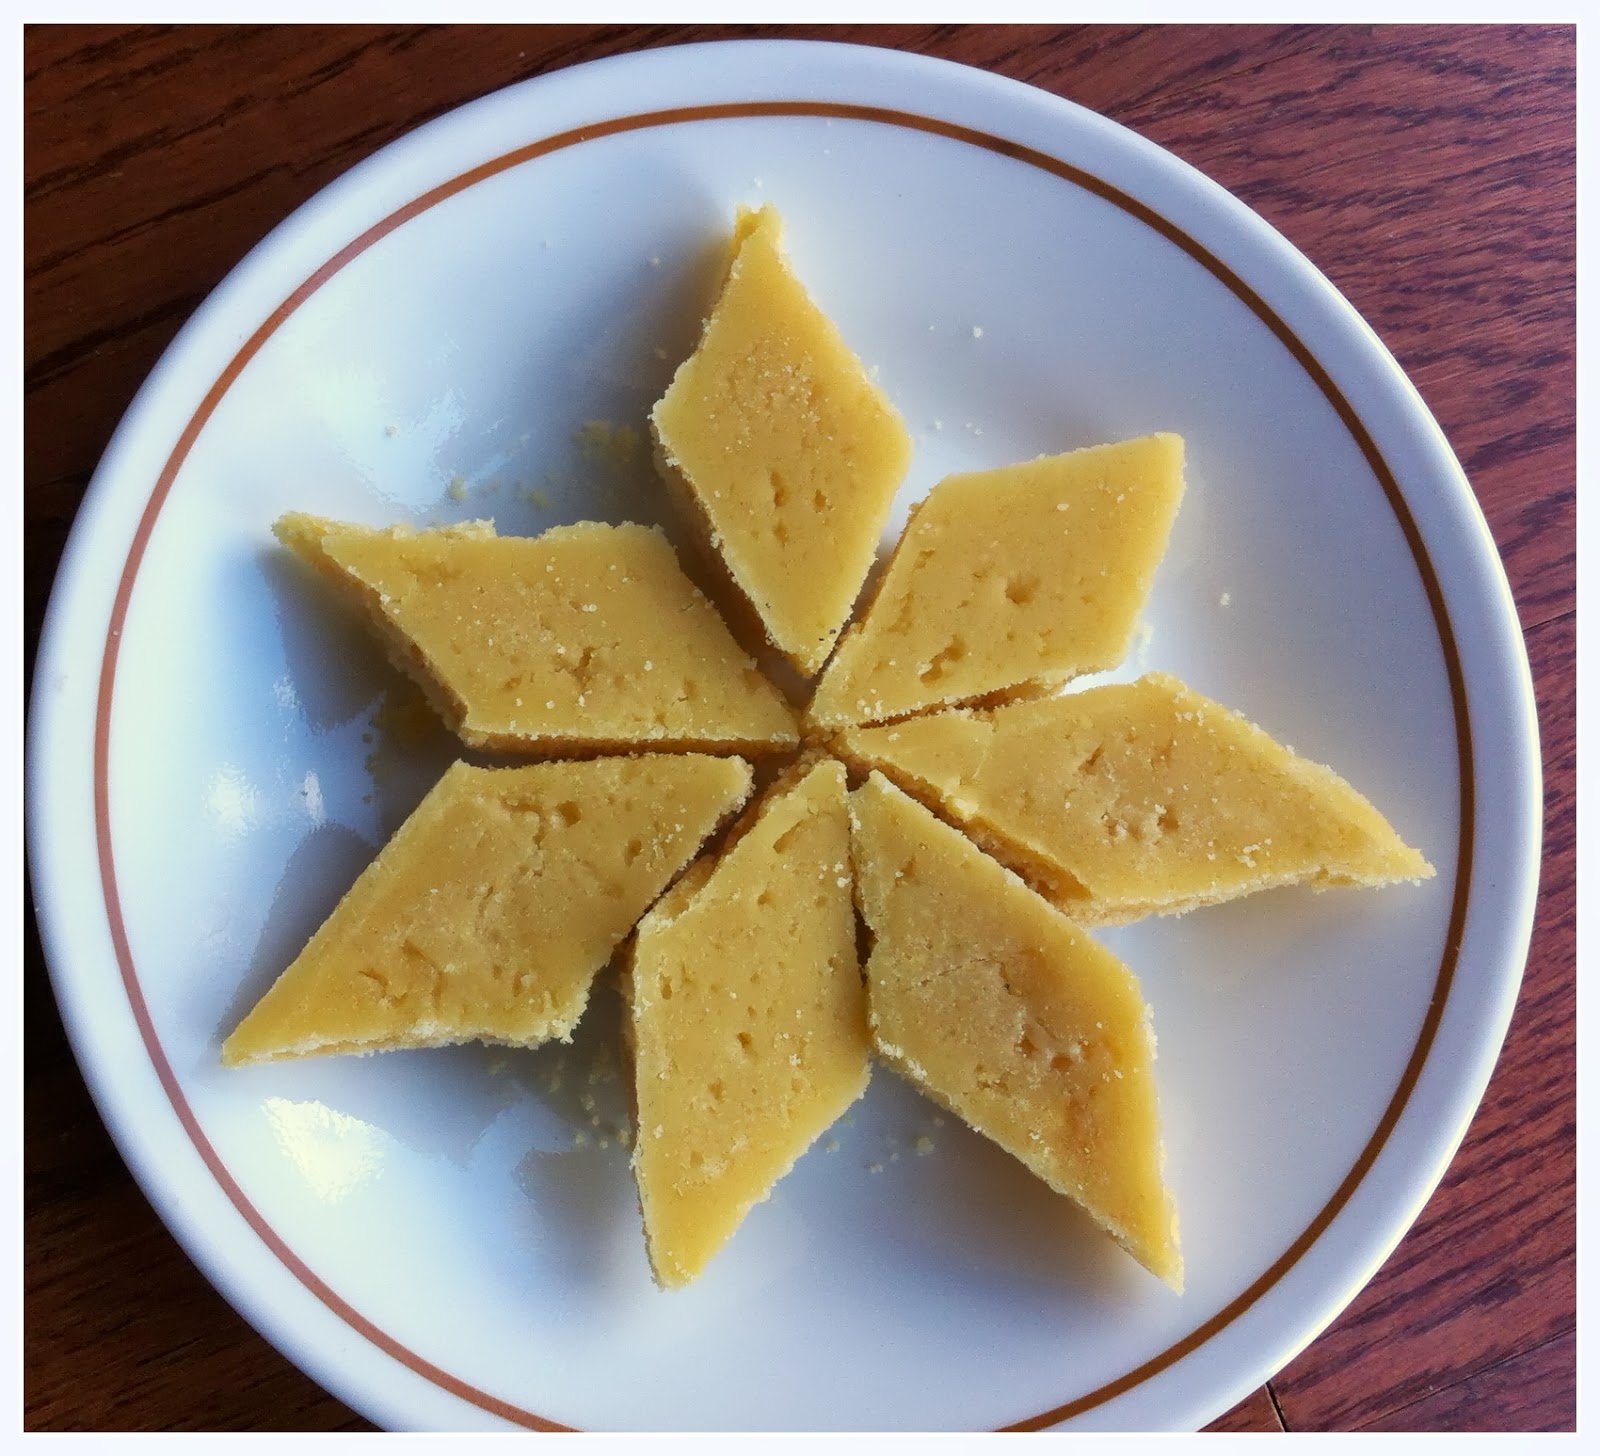
Mysore Pak

Mysore Pak is the mother of all South-Indian sweets. It is prepared with chickpea flour cooked with lots of sugar and ghee... as a matter of fact, the chickpea flour is just a humble vehicle that binds together all the sugar and ghee :). It's consistency is like that of a soft, slightly crumbly, and slightly moist cookie. The amount of ghee determines how moist the Mysore Pak is. 

I have prepared an extremely easy microwavable version of Mysore Pak. As easy as it is to prepare the whole thing in a microwave, undeniably, it doesn't taste exactly like the full-blown version. This is my mother-in-law's recipe for preparing Mysore Pak - the authentic way. It is easy to prepare and not as rich as the store-bought ones. It is extremely tasty, nonetheless. 

Ingredients (comfortably serves 6):
  1.  1 cup besan/chickpea flour
  2. 2 cups sugar
  3. 1/3 cup water
  4. 3 tablespoons + 1/2 cup ghee / clarified butter
Preparation: 
  1. Butter or grease a pan with ghee and set aside.
  2. Sieve the besan and set aside.
  3. In a wide heavy-bottomed pan, heat 3 tablespoons of ghee over medium heat. When the ghee is warm, reduce the heat to low and roast the besan for about 5 minutes until there is a pleasant aroma of besan wafting through your kitchen.
  4. Immediately put the besan in a bowl and crumble and break up all the little lumps (if any) with your hand or a fork. It is important that the besan be smooth in texture, for a lumpy besan results in a Mysore Pak with a course/lumpy texture. Some tiny lumps are inevitable, so don't go crazy in annihilating every microscopic lump.
  5. Dissolve the sugar and water in the same pan used to roast the besan. Set the heat on medium and stir for about 2 minutes until the sugar and water are well incorporated. 
  6. Now slowly add the besan to the sugar-water, mixing constantly to avoid any lumps. 
  7. Add a couple of tablespoons of ghee and keep stirring the besan on medium heat. Keep stirring constantly. When the besan looks dry or sticks to the pan, add a little more ghee and stir. Don't add all the ghee at once, for the besan will absorb it all in no time and demand for more. It's like ghee-blackhole. No matter how much you add, the besan absorbs it all. So, keep adding the ghee in small installments whenever the besan is dry or sticky and keep stirring.
  8. Keep stirring until the besan leaves the sides of the pan and comes together as a glistening mass (see picture). It takes about 15 minutes to reach this consistency. 
    Consistency of cooked besan. Top: The besan in the hot pan. Bottom: The besan in the greased pan, ready to be smoothed and cut into Mysore Paks
  9. When you reach this state, immediately take the pan off heat and transfer the cooked besan onto the greased pan. Do not leave the besan in the hot pan. A few seconds changes the consistency of the besan. 
  10. Tap the pan to remove air bubbles and gently smooth the besan on top with a greased spatula. 
  11. Let it rest for a couple of minutes. Before the besan cools to room temperature, cut the besan into squares or diamonds. Let it cool to room temperature. 
  12. When it is cool, the cooked sweet would have slightly hardened. Gently remove the Mysore Paks from the pan (do not invert the pan, gently remove each square of sweet) and store in an air-tight container at room temperature, for about a month. 
Enjoy the Mysore Paks! 


If your Mysore Pak seems crumbly, it means you skimped on the ghee or let the besan cook a little longer. No worries, they still taste good. And if your Mysore Pak is too chewy and doesn't harden, it means the besan should cook a little while longer. You could put the whole thing back in the pan and heat it a little more, but you need to do this before the besan completely cools down. With a little practice, you can identify the right consistency. Make in small batches and practice away! :)

Saturday, March 23, 2013

Kothamalli / Cilantro Thokku

Cilantro is such a flavorful and aromatic herb. Although it's mostly used to garnish and season Indian dishes, it can also be used to prepare a tart and spicy dish that can be used a side-dish. Thokku can be used as a dip and even as a spread on breads.

If any of you are familiar with, or are fans of Grand Sweets' Kothamalli thokku and have been trying to replicate it at home, look no further! My mother-in-law has outdone herself with this thokku recipe. The thokku tastes very much like the popular one!


Ingredients (yields about 1 - 1.5 cups):
  1. A big bunch of cilantro / coriander leaves (as purchased from the store and amounting to about 4 cups). Remove half of the stalks (the tough ends), not the whole. The stalks are equally flavorful.
  2. 1/2 inch ball of tamarind
  3. 3 tablespoons ulutham paruppu / split urad dhal / split black gram dhal
  4. 4-5 dry red chillies
  5. ⅓ cup sesame oil
  6. 2 teaspoons salt
  7. 1.5 - 2 teaspoons hing / asafoetida
  8. 2 teaspoons black mustard seeds
  9. 2 teaspoons jaggery / brown sugar

Preparation:
  1. In a tablespoon of oil, fry the ulutham paruppu / split black gram, hing and red chillies until the dhal turns golden. Remove from oil.
  2. Wash the cilantro (no need to cut) and towel dry slightly. Add the cilantro to the residual oil in the pan from step 1. Saute the cilantro on medium-heat until it wilts. Then add tamarind to the residual heat and stir.
  3. When cool, grind everything from steps 1 and 2 along with salt, to a smooth thick paste by just sprinkling water as required
  4. In the same pan, heat the remaining sesame oil. When hot, splutter mustard seeds, and add the ground paste and keep stirring on low-medium heat. Halfway through the cooking process (in about 5 - 10 minutes), add the jaggery and brown sugar and continue stirring until the thokku comes together as a mass and leaves the sides of the pan. If needed, add more oil as the thokku cooks to avoid it from sticking to the pan. The more oil you add, the more the thokku will absorb and fry for longer resulting a much deeper greenish-brown shade.
  5. Remove from heat, let it cool, then transfer to a clean, dry, air-tight jar. Refrigerate to maximize shelf life.

 
Now this thokku tastes very similar to the Grand Sweets' one. However, the Grand Sweet's version has twice the amount of tamarind used in this recipe, a little more salt, and way more oil. A comparative taste-test reveals how much tamarind has gone into the Grand Sweets'  version! So if you are looking to get the exact taste of the packaged thokku, use more tamarind, oil, and salt. In my opinion, the recipe listed here retains and highlights the flavor of the coriander leaves as opposed to the packaged one that masks the taste of the herb with its liberal use of tamarind. While both versions taste really good, you can adjust the proportions of tamarind and salt to arrive at a version that you like.  Also, since this thokku is not meant to be stored for a long period of time, the conservative amount of oil used in this recipe is sufficient.


Friday, March 22, 2013

Mixed Vegetable Gothsu

Gothsu is a tart and spicy side-dish that's usually prepared with tamarind and moong dhal. My mother-in-law and mom prepare a slightly different version (than mine) with plenty of vegetables, no dhal, and some extra spices that taste really good, so I'm recording their recipe here.


Ingredients:
  1. 2 tablespoons olive oil / vegetable oil
  2. 1 teaspoon black mustard seeds
  3. 1.5 teaspoons kadala paruppu / bengal gram dhal
  4. 1 teaspoon minced ginger
  5. 2 green chillies, chopped
  6. few curry leaves
  7. 1 teaspoon turmeric powder
  8. ¼ teaspoon hing
  9. 1 onion, finely chopped
  10. 1.5 inch ball of tamarind
  11. 1 tomato, finely chopped
  12. 1 potato, chopped
  13. 2 red/yellow bell peppers, seeded and chopped
  14. 1 small eggplant, chopped
  15. 1 - 1.5 teaspoons salt, according to taste
  16. Spice powder
    1. 1.5 teaspoons kadala paruppu / bengal gram dhal
    2. 2 dry red chillies
    3. 2.5 teaspoons coriander seeds / dhania

Preparation:
  1. To prepare the spice powder:
    1. Dry roast the bengal gram dhal, red chillies and coriander seeds until they release their aroma and the dhal just begins to change color. Cool, and grind to a slightly coarse powder.
  2. Extract tamarind juice:
    1. Soak the tamarind in hot water for 15 minutes. Then, extract the juice by squeezing the soft pulp. Strain the juice. Repeat the process with lukewarm water and squeeze out more juice until the tamarind is dry. Throw the tamarind residue and reserve the extract/juice.
  3. In a medium sauce-pan, heat the oil. When hot, splutter mustard seeds, then add bengal gram dhal, curry leaves, and hing. Fry for a few seconds. Then add ginger and green chillies and saute for a few seconds.
  4. Add onions and saute on medium-heat until it turns translucent.
  5. Add tomatoes and saute until it begins to cook.
  6. Add the remaining vegetables and saute for about 5 minutes. Add salt and turmeric powder, mix well, and close the pan to allow the vegetables to cook. Check and stir periodically.
  7. After 10 minutes of cooking the vegetables, add the tamarind extract and a little more water if needed (to dilute) and continue to cook with the pan closed.
  8. When the vegetables are cooked and the raw tamarind smell is absent, reduce the heat to low, add the prepared spice powder (from step 1) and let the mixture simmer for 10 minutes.

When everything is incorporated remove from heat and serve with rice, pongal, upma, or roti.

Thursday, March 21, 2013

Rava Kesari

Rava Kesari is one of the most common and popular desserts in South India. It is often prepared as an offering (prasad) to the Gods. It's easy to prepare and tastes rich and decadent. Kesari is surely a simple and classic Indian dessert. 

The recipe below is for the most classic and traditional Rava Kesari.

Ingredients:
  1. 1 cup fine or semi-fine rava / sooji
  2. 3 cups water or equal amounts of milk for a richer, creamier version
  3. 2  cups sugar
  4. ¼ cup ghee (or slightly less)
  5. ½ teaspoon freshly ground cardamom
  6. few strands of saffron
  7. few cashews and raisins

Preparation:
  1. With a teaspoon of ghee fry the cashews and raisins until the raisins plump and the cashews turn golden. Remove from ghee and strain on paper towels.
  2. With the residual ghee from above, fry the rava on low-medium heat until it just begins to change color. Immediately remove from heat and transfer from the pan.
  3. Bring the water or milk (if using) to a rolling boil. If using milk, add saffron to the hot milk so that its flavor infuses better.
  4. Reduce the heat to low and slowly add the rava to the hot water/milk constantly stirring it to avoid lumps. Keep stirring on low heat until the rava cooks and comes together as a thick mass without any water.
  5. Then, add sugar and keep stirring with remaining ghee until the rava leaves the sides of the pan and comes together. Remove from heat.
  6. Garnish with cardamom, saffron, and the fried nuts and raisins. Mix well and serve. 

 Kesari stores well for a few days in the fridge. 


Wednesday, March 20, 2013

Spiced Plaintain Powder / Vazhakkai Podi

South Indians love plantains because they are surplus in our tropical climate. They taste excellent when mildly spiced with chillies, dhals/grains, and coconut. There are several ways in which plantain is spiced and prepared, but this particular recipe that comes from my in-laws is the most unique of them all. This was the first time I even heard of it, so to me it is unique indeed. The plantains are roasted/broiled, then peeled and grated and mixed with a mixture of ground spices. Interesting, isn't it?

the spiced powder

Ingredients:
  1. 2 plantains
  2. 3 tablespoons thoor dhal / thuvaram paruppu
  3. 1.5 tablespoons ulutham paruppu / split black gram dhal
  4. ½ teaspoon hing / asafoetida
  5. 1 teaspoon salt or as needed
  6. 3 dry red chillies
  7. 1 tablespoon olive oil

Preparation:
  1. Brush the plantains with olive oil and broil them for 10-15 minutes until they are blackened on the outside and not too soft or tender to the touch. They should hold their shape to be grated. If you don't own an oven, roast the plantain (coated with some oil) over a low flame.
  2. Allow them to cool, then peel and grate them on the larger side of a box grater. 
  3. Meanwhile, dry roast the thoor dhal, split black gram dhal, hing, and chillies on medium heat until the dhals begin to change color. Let them cool and then grind along with salt to a slightly coarse powder. 
  4. Without removing the spice mixture from the blender/grinder, add the grated plantain and mix everything together by pulsing just a couple of times. Do not try to over grind because the plantain would lump and stick to the blender. 
That's it. The spiced plantain powder is ready. A couple of spoons of it is mixed with some rice and some sesame oil/ghee to make a flavored/spiced rice. It tastes really good - almost like thengai (coconut) podi. The podi doesn't have a long shelf-life because of the cooked plantain. It stores well in the fridge for a few days, though.

Tuesday, March 19, 2013

Kunukku

Kunukku is a deep fried nugget of spiced lentils and rice. It's kind of like vadai, but the proporition of ingredients are slightly different. Usually, left over vadai batter is utilized to make kunukku. It's crunchy, crispy, and an easy to prepare fritter/starter. 


 Ingredients:

  1. ½ cup kadala paruppu / bengal gram dhal
  2. ½ cup thuvaram paruppu / thoor dhal
  3. ¼ cup rice
  4. ¼ cup ulutham paruppu / split black gram dhal
  5. 2-3 dry red chillies
  6. 1 teaspoon salt, or according to taste
  7. ¼ teaspoon hing / asafoetida
  8. about 4 cups vegetable oil
  9. some curry leaves

Preparation:
  1. Soak the bengal gram dhal, thoor dhal, split black gram dhal, rice, and red chillies for 1 hour. Strain the water and coarsely grind everything with about 2 tablespoons of water (or slightly more if needed) to prepare the batter. The batter's consistency should be the same as vadai batter - thick and moist. A slightly coarse batter would result in crispy fritters. 
  2. To the batter, mix hing, salt, and curry leaves. 
  3. Heat oil in a cast-iron pot on medium-high heat. Check if the oil is hot by dropping a little bit of batter. If it immediately sizzles and rises to the top, the oil is hot. Maintain the oil temperature by adjusting the heat between medium and medium-high. 
  4. Pick up small nuggets of the batter and drop carefully into the oil. Do not overcrowd the pot with more than 5 kunukkus. Fry until crispy and golden brown. 
  5. Remove the kunukkus and drain on paper towels. 
 Serve with ketchup or sauce. Just the plain crispy kunukkus is great with tea/coffee.  
 

Monday, March 18, 2013

Mixed Fruit & Vegetable Pickle

Where will we Indians be without our pickles? Spiced preserves are one of our unique specialties. Almost any fruit and vegetable can be spiced and preserved to be tongue-clicking-ly good! 

In lieu of tart green mangoes, we used tart Granny Smith apple along with carrots, lemon and ginger! Thanks to my in-laws for making this awesome pickle. We have been going at it as if it were regular curry! An entire bottle of pickle is fast disappearing - that's how awesome it is! Highly recommended, and not to mention, extremely simple to prepare.


Ingredients:

  1. 2 carrots, peeled and sliced into small pieces
  2. 1 Granny Smith apple, finely chopped
  3. ¼ cup finely chopped ginger
  4. 1 lemon, finely chopped
  5. 1/3 cup sesame oil
  6. 3 - 4 teaspoons chilli powder
  7. 5 - 6 teaspoons salt
  8. 2 teaspoons turmeric powder
  9. 1 teaspoon methi / vendhayam / fenugreek seeds
  10. ½ teaspoon hing / asafoetida
  11. 1 teaspoon black mustard seeds

Preparation:
  1. Cut the vegetables and fruits into small pieces/slices. Take a clean, dry jar and keep ready. 
  2. Layer the veggies & fruits in the jar. That is, add carrots into the jar, then add some salt. On top of it, add the chopped apple and then salt. Repeat until all the veggies & fruits are put into the jar with a layer of salt in between. 
  3. Now add turmeric powder to the jar and mix everything. Next, add chilli powder and mix well. Shake and stir to mix everything. 
  4. On medium heat, dry roast the fenugreek seeds with hing. Allow to cool and grind to a smooth powder (mortar and pestle works well to do this). 
  5. Add the fenugreek-hing powder to the pickle and mix well. 
  6. Heat sesame oil in a pan. When hot, splutter mustard seeds. Add this to the pickle in the jar. Mix well. 
  7. Close the jar tightly and let the pickle sit at room temperature for about 1 week, stirring/mixing everyday. This helps the pickle to marinate well and absorb the spices and become soft and yummy. If you live in a humid and hot place, do not keep the pickle at room temperature for more than 3 days, or check periodically to make sure it doesn't turn bad. When the pickle is marinated, store in the fridge. We started using the pickle within a couple of days and it was still very good!
This pickle is crunchy, tasty, and an all-round side-dish!