Showing posts with label eggless baking. Show all posts

Thursday, September 7, 2017

Eggless Orange Cookies

Citrus based desserts have a special place in my family. I'd been wanting to try orange cookies for a really long time, and I finally made time to bake some early this year.

They burst with the aromatic flavor of orange, and are chewy and soft inside. Also, incredibly easy to make a quick batch in no time at all!


Wednesday, September 6, 2017

Eggless Mango Saffron Muffins with Pistachios


These cupcakes are a slight twist to a tried, tested, and much appreciated recipe for eggless mango cake.

Saffron and cardamom are added to most Indian desserts. Although they are added together, they complement each other beautifully without overshadowing or competing for their individual flavors. However, I feel the underlying dish loses its inherent flavor in the midst of these two strong spices. Since the flavor of mango deserves to stand-out, I suggest adding a hint of either cardamom or saffron to amplify the flavor quotient of the overall dish while still preserving the inherent taste of the fruit and spice. Since I have tried the cake version of this recipe with cardamom, I added saffron and pistachios this time.

Tuesday, January 20, 2015

Chocolate & Walnut Cookies

It's been so long since I baked, I was literally dreaming about it. So, I set out to rectify it this weekend. After taking stock of my sparse pantry, I decided to make these simple cookies.

This is a mildly sweet cookie with bites of walnut and just enough chocolate to satisfy your craving. 


Thursday, January 15, 2015

Apple Pie

I know it's been awhile since Thanksgiving 2014, but it's not too late to share a few things I baked and enjoyed with friends. 

Classic Apple Pie with homemade pie crust is hard to beat. Last Fall was a literal apple fest at our place, and it seemed fitting to have this pie. It looks messy because of my last-minute "improvisations", but it tastes pretty good.


Saturday, October 25, 2014

Apple Betty

A "betty" is apparently an old-fashioned baked fruit dessert prepared with crisp bread cubes. 

I was perusing through Better Homes and Gardens New Cook Book, which happens to be the one and only cook book owned by my husband from his bachelor days. How the book came to his possession is a funny story in and of itself, but the fact that it has faithfully kept its place on the bookshelf, is funnier still. The book has a lot of American classic recipes, so I have referred to it on many occasions. 

We went on a merry apple picking expedition a month ago, and I was confident that I would put the two generous bags of apples we plucked to good use. And I did, while internally repeating the saying - "An apple a day, keeps the doctor away". But like losing those last few pesky pounds, it became a task to finish the last bunch of apples. I was running out of ideas, so I flipped through the above said book, and landed on a recipe called "peach-berry betty".  Betty? Intrigued, I went through it, and it seemed easy and different; it almost wholly showcases the fruit without the addition of too much sugar, so I tried it out by using apples, and everyone quite liked it. 

It is a simple, comforting, and spicy dessert for a Fall evening. The smell of baked apples and spices evokes the flavors of Fall like no other. Who needs scented candles, when you can bake and eat this aromatic dish.


Monday, September 22, 2014

Eggless Apples & Berries Cobbler

September is nearing its end, and some of us are still in denial that Summer is over and 2014 is in its last quarter. But, as with most things in life, the only available choice is to embrace the present and do the best with it. 

Fall is a lovely season of its own - especially where I live. The leaves morph into bright, fiery colors, the weather takes on a crisp, manageable chill, and together, the colors and the clean, cool air brighten my spirits, if only for a few moments per day. 

So, embracing the weather, and our love for Nature, we went apple and berry picking at a local orchard/farm, and had a lovely time roaming through the rows upon rows of immaculately grown trees, and plucking several different varieties of alluring apples straight from the trees. Now, we have enough apples to last us for weeks!
 

Since it had been a while since I baked, I made some cobbler with the fresh fruits. It makes a comforting Fall dessert.

Friday, August 1, 2014

Eggless Black Forest Cake with Whole Wheat and Finger Millet Flour

That's a long title for a post!

My mom has a sweet tooth and is also a chocoholic. So, I knew I was going to make a classic chocolate cake for her birthday to keep it simple and enjoyable. However, as much as she loves sweets and chocolates, she is also very particular (and sometimes obsessive) about eating healthy and staying away from refined flour and sugar. Since millets have always been her favorite, I knew I had to make this incredible cake when I saw this recipe. Prior to this, I'd never heard of finger-millet flour used in baking, so it was quite intriguing to me! I adapted the recipe a little and made a black forest cake with cherries and cream. I was slightly wary about my adjustments to the ingredients, and also a tiny bit skeptical about whether the cake would hold itself and taste ok. 

I needn't have worried. I was beyond amazed and happy with the results (and so was my family) that such a healthy cake could be baked! Let me list the ways in which this is really a "healthy" cake: 1) it has no butter (just 1/4 cup of olive oil), 2) it has no refined sugar (just some palm sugar), 3) it has no refined flour (just a combination of multi-grain whole wheat and finger millet flours), 4) it has yogurt and milk, and 5) bonus points: it has chocolate!!


Such a cake sounds mythical doesn't it? But it exists! In terms of texture, the cake holds well, and it looks and tastes moist and spongy. However (you knew there was one such a pause...), experienced and sophisticated palates can tell that the cake was not made with regular flour. You can taste just a hint of earthy, grainy texture in the cake. But, in the grand scheme of things, this is not really such a flaw!

So, without much rambling, here's how it's done. 


Thursday, July 10, 2014

Eggless Lemon & Lime Cookies with Palm Sugar

I love a certain brand of lemon cookies that are handed out in specific airlines. Needless to say, my husband is also a big fan of citrus based desserts and sweets. So, this is actually long overdue.

I have been trying to bake with sugar substitutes like splenda or truvia, so that everyone can enjoy the baked treats. But, it's been a challenge to use these substitutes and get an end-product that is satisfying and not a complete compromise. My mom had been asking me about the availability of palm sugar here, and I was clueless. A quick visit to the organic section of our grocery store revealed the presence of several brands of palm sugar (coconut palm sugar), so I picked up a packet. And what a wonderful discovery! Palm sugar tastes wonderful - it is slightly less sweeter than regular white sugar, but with amazing smokey caramel undertones. I also read that palm sugar can be comfortably substituted for white sugar (measure to measure) while baking. So, I used palm sugar to bake these cookies and they turned out fantastic, probably even better than regular sugar!


Palm sugar is called pana vellam (in Tamil) and is commonly available and used in India and rest of Asia. It has a low glycemic index (that is, it doesn't cause blood sugar spikes) and is rich in nutrients, so it is ideal for both people with diabetes as well as those that are trying to cut down on white sugar. Yes, it is definitely more expensive than regular sugar (outside of India/Asia, at least), so it's not economical to splurge on desserts with palm sugar alone. But, for special occasions, everyone can enjoy desserts made with palm sugar without much guilt.

These cookies are so lemony and chewy and fragrant, they are refreshing and yummy! Plus, because of the addition of palm sugar, the cookies have a slight caramel flavor and they are chewy and soft. And of course, they are not too sweet, so one can munch on a few too many without realizing how many have gone in! Palm sugar is similar to brown sugar in that, while used in baking cookies, they make the cookies soft and chewy. White sugar makes the cookies crisp. So, a mix of brown and white sugars ensures a chewy middle and crisp exterior, like Nestle Tollhouse cookies!

Anyway, I think my excitement at finding a good white-sugar alternative is palpable! I will stop now and go onto the recipe.


Saturday, March 15, 2014

Mini Cumin Butter Cookies / Jeera Butter Biscuits

Jeera biscuits/cookies (we call cookies as biscuits in India) are one of my husband's favorite savory items. Every so often, he hankers for them, and requests that I make some. Last weekend was one of those days when he craved for them. Thankfully, they are very easy to make and takes just 30 minutes of total work. 

I use two basic methods to make these cookies. The most frequently used recipe is this one (with cumin seeds instead of oregano), and the other commonly used is this one (with lots of cumin!). This time I borrowed elements from both recipes and decided to add more butter (sinful!) for the buttery aroma reminiscent of the melt-in-your-mouth powdery soft butter biscuits we get in Indian bakeries!

Also, this time I used a 1" (I think it's 1", but could be slightly smaller or larger) fluted round cookie cutter to make cookies that look like clouds of puffed buttery, cumin-y, golden-brown crunchiness! Anything that is a mini/baby version of anything is cute by default, right?!


Saturday, February 15, 2014

Eggless Tiramisu

Sometimes, something as simple as a certain note in a fragrance can completely transport us to a special place and time. A whiff of sandalwood, a breeze tinged with eucalyptus, the warm scent of fresh henna,  the aroma of curry leaves spluttering in ghee. It is a surreal kind of time travel. I am usually not too sentimental (well, I try), but some tastes and smells are strongly evocative to me. It brings me to the brink of memories - bitter, sad, exhilarating, comforting. And the heady mix of coffee, cocoa, and cream of a Tiramisu is one of those.

So, Tiramisu has special meaning in our lives. We both love it for different reasons. Since I'm driving myself with small incentives and rewards to keep up my motivation to finish my goals for the week, I thought tiramisu (both making and indulging in it) would be a good incentive at the end of the week. I thought of trying something different to replace the traditional ladyfinger cookies that lace tiramisu. So, this version is a hybrid between a tiramisu cake and traditional tiramisu. I baked an eggless vanilla cake, cut it into 2 layers, trimmed the layers, and then assembled them with layers of coffee, mascarpone-cream, and whipped cream. Being eggless, it is not an authentic Italian version, but it's a good enough substitute for us! As long as there is coffee, cream, and cocoa...

I baked the cake one evening, then whipped together the simple filling the next evening. And assembled everything. The tiramisu has to be refrigerated for about 4-8 hours before serving.


Ingredients for the Vanilla Sponge Cake:
  1. 2 cups all-purpose flour
  2. 1.5 cups sugar
  3. 1 teaspoon baking soda
  4. 1/2 teaspoon salt
  5. 1 cup milk (at room temperature)
  6. 1 tablespoon vanilla extract
  7. 1 tablespoon lemon juice / vinegar
  8. 1/2 cup vegetable oil
Baking the Cake:
  1. Preheat oven at 350 F. 
  2. Sift and mix all the dry ingredients
  3. Whisk together all the wet ingredients, except vinegar or lemon juice
  4. Slowly fold/mix the dry ingredients with the wet ingredients. 
  5. Finally add lemon juice/vinegar and stir gently until incorporated. Transfer to a 9 inch cake pan and bake for 35 minutes or until a tester comes out clean
Cool the cake on a cooling rack for 10-15 minutes and then loosen the edges and flip onto a plate. When completely cool, using a serrated knife, cut the cake longitudinally into two layers. Then either cut the cake into long strips similar to ladyfinger cookies typically used in tiramisu, or cut the cake to fit the dish you are going to assemble the tiramisu in. I cut out two rectangles from the two circular layers and used the remaining pieces to fill up my dish (as seen in the pictures below).

Coffee Extract:
In one cup of hot water, stir 1 tablespoon instant coffee and 1 teaspoon sugar. Let the coffee come to room temperature. Then stir in 1 tablespoon Kahlua/coffee liqueur (optional, but recommended).

Ingredients & procedure to prepare the whipped-cream topping:
  1. 1.25 cups heavy whipping cream 
  2. 1 tablespoon prepared coffee extract
  3. 1 tablespoon Kahlua/coffee liqueur
  4. 1/4 cup sugar
  5. 1 teaspoon vanilla extract
Whip the cream until it begins to form soft peaks. Add coffee extract, Kahlua, vanilla extract and sugar and continue to whip until stiff peaks form. Reserve 1/4 cup of this whipped cream to mix with the filling below.

Ingredients & procedure to prepare the mascarpone filling:
  1. 8 ounces (1 package) mascarpone cheese
  2. 1 tablespoon prepared coffee extract
  3. 1 tablespoon Kahlua/coffee liqueur
  4. 1/4 cup milk
  5. 1 tablespoon sugar
  6. 2 teaspoons vanilla extract
  7. 1/4 cup prepared whipped-cream topping
In a bowl whisk/mix together mascarpone, coffee extract, Kahlua, sugar, and vanilla extract until smooth. Add milk and whisk in. Gently fold in 1/4 cup whipped cream until just combined.

Assembling the Tiramisu:
Additional ingredients needed: A couple of tablespoons of unsweetened cocoa powder and chocolate shavings of your choice. I used some peppermint-chocolate shavings, because we love mint and chocolate, and of course, coffee!

Here's how the tiramisu is assembled (usually Tiramisu has three layers of ladyfinger cookies/cake sandwiching the filling and topping. But just for simplicity, I made only 2 layers. So depending on how many layers you want to form, distribute the filling and cream accordingly)
  1. Place one layer of cake that is cut into desired shapes into the dish of your choice.
  2. Use half of the remaining coffee extract, and spoon it over the cake until the cake absorbs the coffee.
  3. Use half of the mascarpone filling and spread it over the cake
  4. Use half of the whipped cream and spread it over the cake
  5. Dust some cocoa powder on top
  6. Repeat with the second layer of cake, cut into desired shapes. 
    • Ladle remaining coffee extract on top of the cake
    • Spread remaining mascarpone cream on top
    • Spread remaining whipped cream on top
  7. Close the dish and refrigerate for at least 2 hours or overnight to let the flavors meld.

 Dust some cocoa powder on top and sprinkle some chocolate shavings. Cut a piece and enjoy!


Friday, January 31, 2014

Eggless Molten Chocolate Cake

The most fun lab (yet) in an online course I'm taking has to be this one - baking molten chocolate cake! I tried an eggless version and it turned out pretty well! The cake was not as chocolately as some other cakes I've baked, but this was still a nice treat. The specialty of this cake is its warm gooey molten chocolatey center! The perfect chocolate dessert in this horrible arctic winter. So, the most important variable in baking this cake is the temperature and time. Keeping temperature at a constant 350 F, it takes just a few minutes before the cake turns from molten-in-the-center to fully baked. Even if you miss the molten center, not to worry. You still end up with a perfectly baked chocolate cake!

The experiment to figure out when the center gets molten and the sides are baked; extreme left: cake is uncooked; extreme right and front: cake is completely cooked.
Ingredients:
  1. 3/4 cup all-purpose flour
  2. 3/4 cup white sugar
  3. 3 tablespoons unsweetened cocoa powder
  4. 1 teaspoon baking soda
  5. 1/4 teaspoon salt
  6. 1/2 cup vegetable oil
  7. 1 teaspoon vinegar
  8. 1 teaspoon baking powder
  9. 1 teaspoon instant coffee powder. The coffee intensifies the chocolate flavor
  10. 1 cup water

Preparation:
Mix dry ingredients together. Gently mix in all wet ingredients except vinegar. Add vinegar, stir a few times, then pour into eight 2" inch wide oiled ramekins (up to 2/3rd full) or a 9 inch buttered baking pan. Or you can use a cupcake pan. Bake at 350 F for 12 minutes if baking in ramekins, and about 10-11 minutes if using a cupcake pan. I am guessing it will take about 14-15  minutes or slightly longer when baked in a  cake pan. The center will be molten when you dig into the cake, but the top will look baked, especially the sides of the cake.

Enjoy!

Tuesday, January 14, 2014

Eggless Lime & Ginger Cake

On a certain day at the grocery store, I couldn't find any individual limes. So, I got a big bag of limes to make some salads and juices. But after numerous salads and juices, the limes were still aplenty. My husband was constantly fretting over the limes going bad and kept subtly suggesting that I make something sweet with them - perhaps a cake or a cupcake? Hint received.

When the holidays rolled around and I had some time on my hands, I tweaked my lemon cake recipe to prepare this version of a lime & ginger cake.

The limes I had were unusually sweet and not as tart as usual. They were quite mild, actually. So check the tartness and sweetness of your limes to adapt the measurements as required.

Ingredients:
  1. 1.5 cups all-purpose flour
  2. 1 cup sugar
  3. the zest of 3 limes
  4. 1.5 tablespoons lime juice
  5. 1 tablespoon of grated ginger
  6. 1 teaspoon baking soda
  7. 1/2 teaspoon salt
  8. 1 cup milk (2% is fine)
  9. 1/3 cup vegetable oil
Glaze: 
  1. 1/4 cup lime juice
  2. 1 tablespoon sugar
  3. the zest of 1 lime
  4. 1/2 teaspoon powdered ginger 
Preparation:
  1. Prepare dry ingredients: Sift and mix - flour, baking soda and salt. Mix sugar into it.
  2. Prepare wet ingredients: Whisk lime zest and grated ginger with milk. Add oil and mix/whisk.
  3. Slowly add/fold dry ingredients into the wet ingredients. 
  4. Finally stir in the lime juice. 
  5. Pour batter into a buttered 9 inch cake pan. Bake at 350 F for 30-35 minutes until a tester comes out clean.
  6. For the glaze:
    1. Mix lime juice and sugar and heat for 5-7 minutes until sugar is dissolved and the syrup is warm. Stir in powdered ginger to the syrup.
Let the cake cake cool for 15 minutes. Since I didn't want the glaze to upstage the ginger by turning the cake too lime-y, I didn't let the cake steep in the glaze.


Serve by drizzling some of the glaze on top of the cake and sprinkling some lime zest on top. Lime and ginger make a lovely pairing. Enjoy!

Sunday, January 12, 2014

Eggless Apricot & Pear Crumb Cake

My husband and his family have a dog back home in India. Today is his birthday, and a milestone one at that! So here's celebrating the loyal pet that fears nothing except thunder and lightning.

Bhairav, giving his "don't mess with me" look :)
Although Bhairav and I have a predator-prey kind of relationship (me being the meek prey that runs for her life, of course), I have been regaled with several stories of him stealthily stealing mangoes and food from the kitchen, so he is a foodie himself. And what more, as a true member of the family, he also loves all things sweet! On our birthdays and special occasions, my mother-in-law prepares yummy sweets like burfi and halwa, and sensing the lovely aroma wafting from the kitchen, he will poke his head through the window and demand that he get a share :). So on our birthdays, it is Bhairav that gets to eat the delicacies in India. This time, as a reversal of how things are done, I baked a cake on Bhairav's birthday, so that we get to celebrate and vicariously eat on behalf of him ;)

 "Hey! What's cooking?"
Bhairav loves sweet fruits like mangoes and jackfruits (his favorite), so I wanted to bake a fruit-based cake. I decided to use pears because the husband was certain that Bhairav would relish pears. In addition to pears, I also added some apricot preserves because I was sure Bhairav wouldn't complain if I added an extra bit of fruit and sweetness. To do something slightly different, I baked a crumb cake with a soft and sweet base and a crunchy exterior. And it was a successful experiment!

Ingredients:

For the Cake
  1. 1/2 stick unsalted butter, at room temperature
  2. 1 cup all-purpose flour
  3. 1/2 cup sugar
  4. 1 teaspoon baking powder
  5. 1/4 teaspoon salt
  6. 1 tablespoon ground flax seed + 3 tablespoons water, whisked together (as an egg substitute)
  7. 1/2 cup yogurt
  8. 1 teaspoon vanilla extract
  9. 1 1/4 cups chopped pears (I used Bartlett pears)
  10. 3 tablespoons + a few dollops of apricot preserves / jelly/jam
Crunchy topping
  1. 1/4 cup all-purpose flour
  2. 1/4 cup dark brown sugar
  3. 1/2 stick cold butter, cut into pieces
  4. 1 cup coarsely ground almonds
  5. 1 teaspoon cardamom powder 
Preparation:
  1. Preheat the oven to 350 F. Butter and flour a 9 inch cake pan
  2. Warm the flax seed mixture in a microwave for 30 seconds. Take it out, whisk well (it will start to become thick and gloopy) and let it rest for 10 minutes
  3. Sift the flour, baking powder and salt and keep aside
  4. Beat butter for a minute. Then add sugar and continue beating for about 3 minutes until soft and creamy
  5. Add the flax seed mixture (it would have become viscous and eggy by now) and beat until incorporated.
  6. Add yogurt, vanilla extract and beat until incorporated.
  7. Add apricot preserves and stir gently into the batter.
  8. Add the dry ingredients and gently fold into the wet ingredients.
  9. Finally, add the pears and give the batter a gentle mix. The batter will be thick. Transfer the batter into the baking pan.
  10. Prepare the topping
    1. Using your hands, mix brown sugar, cardamom and flour. 
    2. Add butter and using your hand or a fork crumble and mix the butter into the flour mixture until the butter is the size of peas. Remember the butter should be cold, so you have to work it in to the flour
    3. Add the coarsely ground almond and give a final mix.
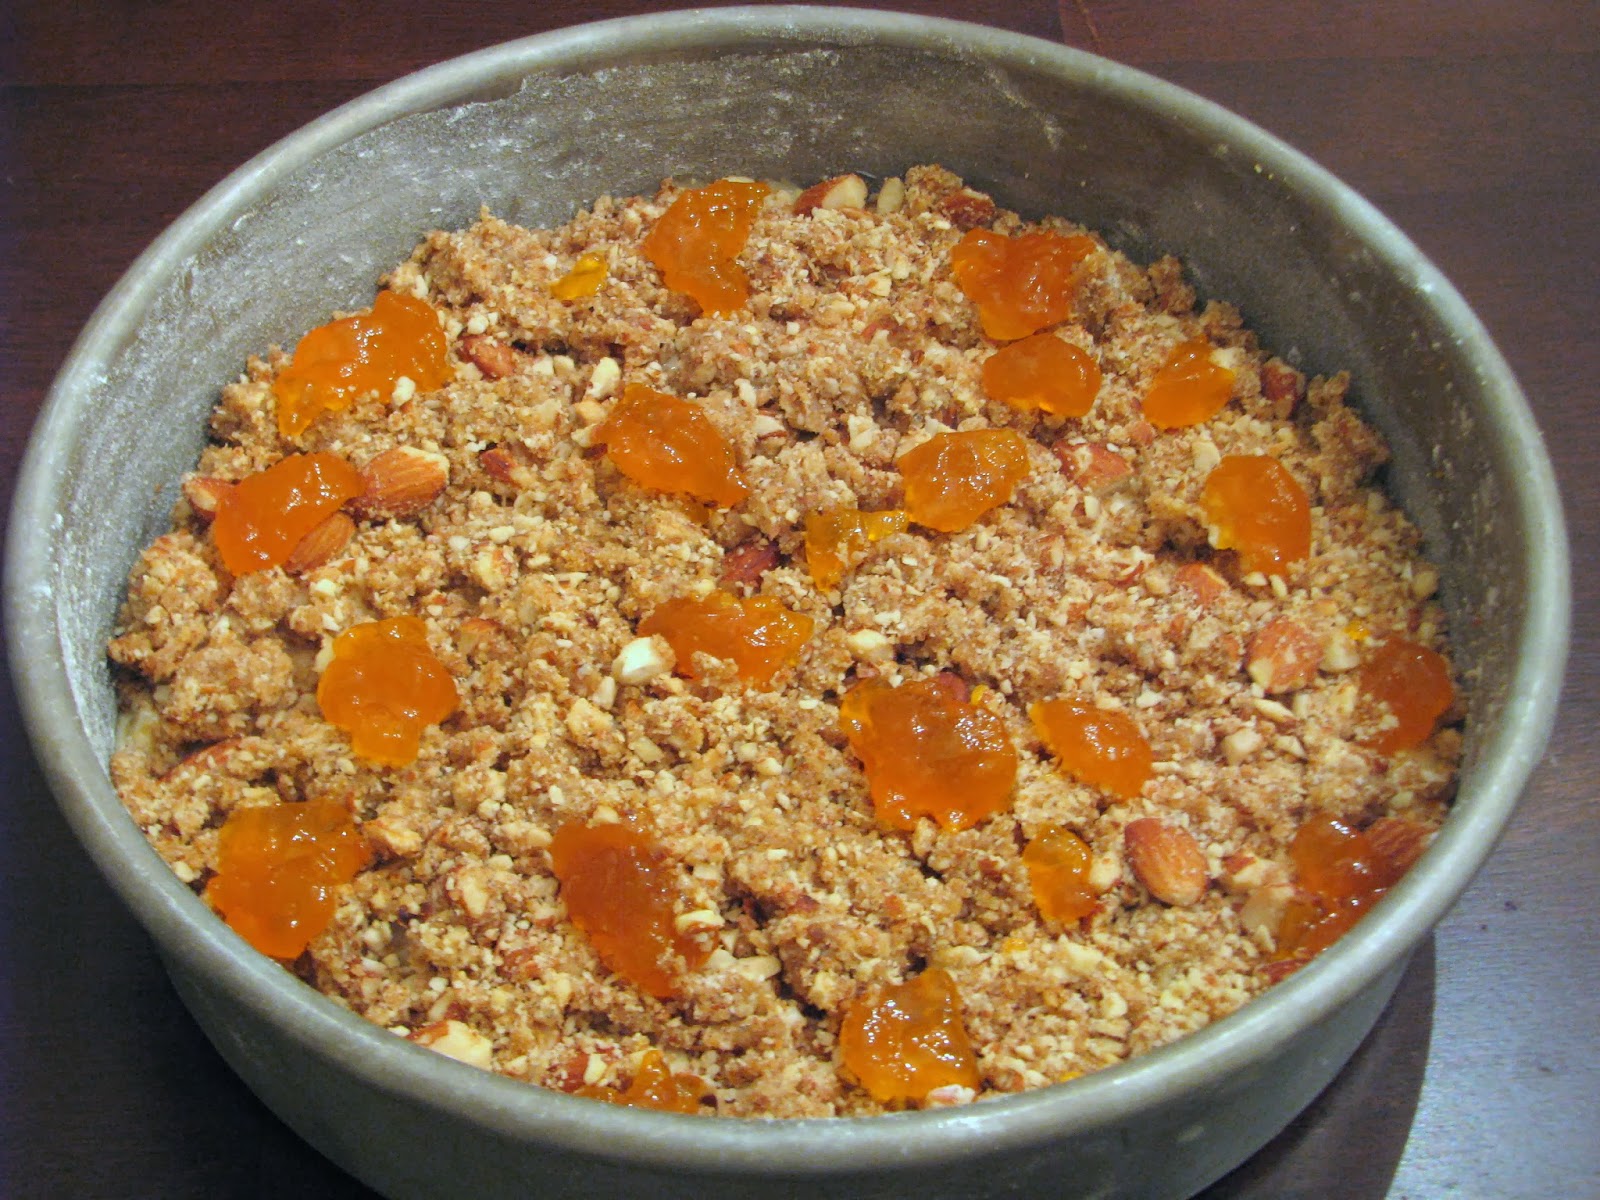
  11. Spread/pile the topping on top of the batter
  12. Finally, spoon a few dollops of apricot preserves onto the crunchy topping
  13. Bake for 45-50 minutes until a tester comes out clean. I actually baked for 52 minutes, if that counts.
Before baking
Let the cake cool. When cool, cut into pieces and serve! Do not try to invert this cake from the pan.
Fresh out of the oven
The cake itself doesn't rise because the crunchy topping would then fall apart. It is a soft and moist cake studded with pears in every bite - if you notice, I added more pears than even flour. So the cake is predominantly structured by pears. The topping is my favorite - it is crispy and flavorful and not too sweet. 

Animals have a unique sixth sense. I hope Bhairav senses this gesture of mine and will be appeased by it sufficiently to not want to maul me the next time I meet him! I hope we have a deal ;). 


Happy Birthday Bhairav. May you have many more happy and healthy birthdays!

Wednesday, January 1, 2014

Eggless Mint Chocolate Chip Pie

This was my Thanksgiving Pie for last year. My husband's company organizes an annual pie contest and bake sale during Thanksgiving to give the proceedings to a local charity. This was the pie that I presented at the contest/sale and surprisingly, it won second place. I'm glad some money could be raised. I also enjoyed making the pie - it was such a welcome distraction from all the work related stress. 


I didn't want to make a pie that was involved and laborious, simply because there wasn't enough time. So I found a wonderful recipe from here and I immediately loved it. I love the combination of mint and chocolate and the recipe sounded so good and yummy, I couldn't resist it. Bonus - you don't have to bake! Just prepare the crust, freeze, prepare the filling, pour into the crust and freeze some more, that's it! 

The crust is crunchylicious - it is made from crushed mint oreo cookies and melted butter that's pressed into the bottom and sides of the pie pan.
The filling is finger licking good - cream cheese, cool whip, cocoa powder, sugar, and milk are all whipped together and laced with crunchy and cool chocolate mints
To add to everything, the pie is served with a drizzle of chocolate syrup!


How can it not be good?! Although I never got to taste the pie, the proof is in the prize it won :). I highly recommend the recipe!

Wednesday, July 31, 2013

Eggless Beet Cake / Eggless Red Velvet Cake

There are those times when you hanker for something baked and sweet despite your hardened resolution against baking. I am someone who happens to love the process of baking. I love baking for itself. Most times I bake just to create something divine and beautiful and flavorful. I am satiated just by the process, and have no need to eat the creation. I am happy seeing others eat. Others don't like this habit of mine.

Enough of the rambling. I am now a fan of "quick baking" that results in small quantities of desserts. It (sort of) indulges my craving to bake, and it creates a small portion of dessert, perfect for two. Mug cakes are my recent favorite. Along those lines, I came across a healthy, easy recipe for a red-velvet cake. It literally takes 15 minutes to make this little cutie. How could I resist?

Slightly modified and adapted from this recipe

Ingredients (4 servings):
  1. 1 small beet, peeled and chopped
  2. 1/3 cup + 1/4 cup low-fat milk 
  3. 1 tablespoon ground flaxseed
  4. 6 teaspoons sugar
  5. 1/8 teaspoon salt
  6. 1 teaspoon vanilla extract
  7. 1 tablespoon butter - melted
  8. 6 tablespoons all-purpose flour
  9. 2 tablespoons unsweetened cocoa powder
  10. 1 teaspoon baking powder
  11. 1.5 teaspoons olive oil/vegetable oil
Preparation:
  1. Heat the olive oil/vegetable oil in a small pan. When hot, add the chopped beet and saute on low-medium heat until the beet is slightly tender. It takes about 7-10 minutes. When done, remove from heat and let it cool. When cool, grind the beet with a drizzle of milk (no more than 1/4 cup milk). Reserve the ground beet puree to be added to the batter. 
  2. In a medium-sized bowl, whisk together the beet puree, milk, flaxseed, sugar and salt. Add in the melted butter and whisk it in. 
  3. Add the vanilla extract and mix well.
  4. Add the cocoa powder and gently stir it in. 
  5. Finally, add the baking powder and all-purpose flour and gently fold everything into the batter.
  6. Grease a 4 inch microwavable bowl (glass works well) and transfer the batter into it. 
  7. Microwave for 3 minutes (or a little longer) until a tester comes out almost clean with just a few crumbs attached.
Let the cake cool. When cool, loosen the edges of the bowl and invert the cake onto a plate. Enjoy with a cup of coffee or with fresh fruit.


A word of warning: This cake is not as sweet as the regular cakes. It is not super yummy either. What else can one expect from a "light" version? It is a compromise, okay? You get to eat cake that is almost as sweet and almost as good as the sinful ones. But you get to eat cake! And bake!

Wednesday, July 3, 2013

Eggless Chocolate Cake with Raspberry Whipped Cream Frosting

I baked two layers of eggless chocolate cake with raspberry whipped cream frosting for a special occasion recently. I decided not to cover the cake with a rich and heavy frosting or icing, because my family is not a fan of heavy frosting. So I chose to decorate the cake with some light, fluffy whipped cream flavored with raspberry jam. 

I baked two layers of 9" by 13" cakes, and sandwiched the two layers by smearing 1/2 cup of raspberry jam. Overall, the cake was not heavy or cloyingly sweet or buttery. It was also moist and tender inside, much to my relief. The only thing I wasn't satisfied with was the crust, but given that I didn't cover the entire cake with icing, and I had to tweak the recipe to keep it eggless, I guess it was inevitable. 

After all my research on eggless baking, this is what I found out:
  • If you are baking without eggs, oil is a better substitute for fat than butter. It keeps the cake moist and fluffy for a long time. And it's true. We had left over cake for almost a week, and even the refrigerated cake was moist. The inside of the cake never dried out.
  • If you are using oil instead of butter, the cake's crust will be slightly coarse and dry (especially the four edges). Butter helps to form a light, airy crust. Hence, the compromise if you choose oil. An easy solution is to slice off the crust and edges before decorating the cake.
  • Butter constitutes 80% fat and 20% milk solids and water. So if you are not using butter to bake, then introduce some water and milk solids to make up for the lack of milk solids & liquid that butter brings to the cake
Therefore, I used oil to keep the cake moist. And the cake was moist (if you ignored the crusty edges)
Since I used oil, I introduced some milk and water to make up for the loss of milk solids and water due to not using butter.

Why use hot water and not just room temperature water? I don't know. Cake experts in cake forums recommend hot water, even boiling water. Even Hershey's recommends it.


Here's how I made it.

Ingredients for one 9" by 13" cake:
  1. 4.5 cups all-purpose flour
  2. 3 cups sugar
  3. 1 cup unsweetened cocoa powder
  4. 2 cups hot water
  5. 1 cup milk (at room temperature)
  6. 1 cup vegetable oil
  7. 3 teaspoons baking soda
  8. 1/2 teaspoon salt
  9. 2.5 ounces semi-sweet chocolate
  10. 1 tablespoon instant coffee granules (intensifies the flavor of chocolate)
  11. 2 tablespoons vanilla extract
Preparation:
  1. Butter and flour a 9 by 13 cake pan. Please use a metal pan if possible. I think the cake's crust gets drier when baked in a glass pan. Maybe I am imagining it, but one layer of cake baked in a glass pan turned out dry on the top, but was still moist inside. The other layer of cake baked in a metal pan had a much lighter crust and was moist inside too.
  2. Sift together the flour, cocoa powder, baking soda, and salt and mix well. Add sugar and mix.
  3. Melt the chocolate in 30 second intervals in the microwave until smooth and lump-free. Add the coffee granules to the melted chocolate and mix well. 
  4. Prepare the wet ingredients: Whisk together the milk, melted chocolate & coffee, and vanilla extract. Finally add the oil and whisk well.
  5. Now slowly add the dry ingredients to the wet ingredients and gently fold until just combined
  6. Finally add the hot water and give a final mix until everything is combined. Do not over mix or vigorously mix. It's okay if there are a few small lumps of flour. Over mixing will result in a tough, dense cake.
  7. Pour the batter in the cake pan and bake for 55 minutes to 1 hour in a 350 F preheated oven until a cake tester inserted in the middle comes out clean.
  8. Place the cake pan on a cooling rack for 20 minutes. Then gently loosen the cake around the edges and carefully invert onto a plate.
Raspberry Whipped Cream Frosting:
  1. 1 cup cold whipping cream
  2. 1/2 cup raspberry jam or raspberry sauce 
  3. 1 teaspoon raspberry extract
Whip the cream till it forms soft-peaks. Add the raspberry jam and raspberry extract, and continue to whip until the cream forms stiff peaks. That's it! Either transfer to a piping bag to pipe out the frosting, or  just slather it on the cake. 

A word of caution: Do not use this frosting if the weather is hot and you expect the cake to be out or at a warm room-temperature for a while. The frosting will melt. Like parts of mine did.


Enjoy!

Tuesday, July 2, 2013

Rhubarb & Strawberry Crisp

Crumbles and crisps are one of my favorite desserts. They involve healthy doses of bubbling fruits and a sweet crisp layer of topping that complements the saucy fruits. In my mind, I find these to be slightly healthier substitutes to the usual cakes and pastries, because of all the fruits in them! In addition, I cut down on the refined flour that the topping usually requires and substitute it with some almond meal - healthy, crunchy, and more flavorful. Of course, all these justifications are just in my mind - to appease myself.

I skimped on the sugar, and regretted it. The tart rhubarbs really need the sugar. So go ahead and add all the quantities I have listed below. In case your rhubarbs are unseasonably sweet, you can cut down on some of the sugar, but don't skip the honey!

The bubbly fruits have beautifully colored and bordered the crisp!

Ingredients (serves 6-8):
For the fruit filling:
  1. 3 rhubarb stalks, peeled and diced
  2. 2 cups sliced strawberries
  3. 1/2 cup honey
  4. 1/4 cup sugar (brown sugar, if possible)
  5. 1/2 teaspoon freshly ground cardamom powder
For the crumble/crisp topping:
  1. 1 cup almond meal (ground almonds)
  2. 1/2 cup oats
  3. 1/2 cup sugar (brown sugar, if possible)
  4. 1 stick cold, unsalted butter, diced
Preparation:
  1. Mix the rhubarbs, strawberries, honey, sugar, and cardamom powder in a mixing bowl. Let everything rest for 15-20 minutes. the strawberries release their juices and become soft. 
  2. Prepare the topping in the meanwhile. Mix together the almond meal, oats and brown sugar. Then, add the butter and mix everything with a fork or your hand (hand works better) to incorporate the butter into the mix. Keep mixing until the butter is strewn around the mixture like small peas. Everything should look crumbly - hence it's called a crumble.
  3. Preheat the oven to 375 F. Spread the fruit filling onto a baking pan (7 by 11 pan works). And evenly pack the crumble topping on top. Do not sprinkle, pack the crumble down in chunks. This ensures a much more crispier top.
  4. Bake for 30 minutes until the top is browned and crispy, and the fruit filling is bubbly.
Serve when warm, along with a dollop of vanilla ice cream. A plain serving is good too!

Tuesday, February 26, 2013

Eggless Lemon Cake

My family members are ardent fans of Starbucks - coffee, muffins, breads, cakes, etc. For a while now, I have been trying to recreate their lemon cake/lemon loaf. Ina Garten's lemon loaf/lemon yogurt cake recipe is excellent and according to me, is even better than the Starbucks' version. But the recipe requires eggs. Wanting the best of both worlds, I have been trying to bake an eggless lemon cake that  at least comes close to the real deal. Adapting from Piece of Cake, this is the recipe I used to make the eggless version.


Ingredients:
  1. 1.5 cups all-purpose flour
  2. 1 cup sugar
  3. 1 teaspoon baking soda
  4. 1/2 teaspoon salt
  5. 1 - 1.25 cups milk (I used 1.25 cups of 2% milk)
  6. The zest of two whole lemons (a lot, I know)
  7.  1 teaspoon vanilla extract
  8. 1 tablespoon  lemon juice
  9. 1/2 cup vegetable oil (I used just a little more than 1/4 cup because I added extra milk)
For the glaze: You need 1/3 cup lemon juice and 1/3 cup sugar. Heat the sugar and juice on medium heat, constantly stirring, until the sugar completely dissolves and makes a syrup of desired consistency. You can't go wrong with this. This glaze makes a difference to the cake - trust me. Do not skip it.

Preparation:
  1. Butter/grease an 8 or 9 inch pan (I used a 9 inch pan). Preheat the oven to 350 F.
  2. Mix the dry ingredients (advisable to sift the flour, baking soda, and salt together). Mix in sugar along with the flour-soda-salt. 
  3. Separately mix the wet ingredients, except lemon juice. I was nervous of directly adding it to milk. First whisk together the milk, lemon zest, vanilla extract, and then whisk in the oil. 
  4. Slowly add dry ingredients to wet ingredients and stir slowly and gently until just incorporated. Finally, add the lemon juice and give a final stir. The batter will look fizzy and more liquid-y than usual cake batters. It's fizzy because of all the lemon, soda, salt action. Don't worry, the cake will turn out fine. 
  5. Pour batter into the prepared pan and bake for 30-35 minutes until a cake tester comes out clean. Let the cake cool in the pan for 10 minutes. Then gently loosen the cake by running a knife around the edges and flip it onto a plate. With a fork, poke some holes on top of the cake. Pour the lemon syrup/glaze over the cake and let it soak in for 15 minutes or more before serving. It's not necessary to use all the syrup. Use as required. 


The cake is intensely lemony, moist, and quite light. It's not dense or chewy, but arguably not as fluffy as the version that takes eggs. Still, people liked it and went for second helpings! This is a good lemon cake that's easy to make to go alongside coffee and tea. 


Tuesday, January 8, 2013

Eggless Banana Chocolate Brownies

I always let a couple of bananas over-ripen every few months weeks. My solution is to put away the banana/s in the freezer and take them out for baking emergencies and inspirations. So, this was one such an attempt.


Ingredients:
  1. 1 cup + 2 tablespoons all purpose flour
  2. 2/3 cup sugar
  3. 3 tablespoons unsweetened cocoa powder
  4. 1 teaspoon baking soda
  5. 1 1/4 cup finely mashed ripe (over-ripened) bananas (about 2-3)
  6. 1/2 cup milk
  7. 1/4 cup vegetable oil
  8. 1 teaspoon vanilla extract
  9. 1 teaspoon instant coffee powder (to bring out the chocolate flavor)
  10. 1/4 cup chopped walnuts
  11. 1/4 cup semi-sweet chocolate chips
Preparation:
  1. Preheat oven to 350 F
  2. In a bowl, beat the oil, sugar, milk, and mashed bananas. 
  3. In a separate bowl sift together the flour, cocoa powder, and baking soda
  4. Add the dry ingredients in small batches to the wet ingredients and mix gently with a spatula. 
  5. When the batter comes together, add the coffee granules and vanilla extract and mix gently with a spatula. Do not over mix. 
  6. Combine the walnuts and chocolate chips together. Toss them with 2 tablespoons of flour so that when they are added to the batter they don't sink to the bottom. 
  7. Add the mixed walnuts and chocolate chips to the batter and stir it gently. 
  8. Pour into a buttered 9"x 4" baking dish and bake for 35 minutes or until a tester inserted in the middle comes out clean. 
Cool to room temperature and cut the brownies. Unlike traditional brownies, the texture of this one is slightly different due to the addition of bananas. Besides, the ratio of banana to chocolate is higher.  But this is intensely moist, slightly chewy and yummy!

Sunday, January 6, 2013

Eggless Oregano Cookies

My friend J sent me a wonderful recipe for Jeera (cumin) cookies a year back. It was, as expected, everyone's favorite. I adapted the recipe by adding Oregano seeds (omam), removing eggs, and adjusting a couple of other measurements. Omam cookies are popular in India as a tea-time snack. So, here is the easy and fail-proof recipe. Thanks to my friend for the initial recipe!


Ingredients (about 20-25 cookies):
  1. 1/4 cup sugar
  2. 1/4 cup thick yogurt (greek or whole)
  3. 3/4 cup vegetable oil
  4. 1.5 teaspoons salt
  5. 2 cups all purpose flour
  6. 1 tablespoon or 2 teaspoons oregano seeds / dried oregano (omam/ajwain)
  7. 1 teaspoon baking soda
Preparation:
  1. Beat the sugar, yogurt, and vegetable oil for a couple of minutes until everything is incorporated. 
  2. Separately sift/mix the flour, salt, soda, and oregano seeds. 
  3. Slowly add the dry ingredients to the wet ingredients and mix gently with a spatula. When the dough begins to come together, knead gently to mix everything. Do not over-mix or knead too much. 
  4. Preheat the oven to 350 F. On a parchment lined baking sheet, form small (1/2 - 1 inch radius) balls and gently press down. Place them 1/2 inch apart and bake for 15-20 minutes until slightly brown around the edges and underneath the cookies. It took me 18 minutes (precisely) for the underside of the cookies to turn golden. 
  5. Remove and let the cookies cool for 10-15 minutes. Store in an air-tight container