Recipe Index:

Friday, January 31, 2014

Eggless Molten Chocolate Cake

The most fun lab (yet) in an online course I'm taking has to be this one - baking molten chocolate cake! I tried an eggless version and it turned out pretty well! The cake was not as chocolately as some other cakes I've baked, but this was still a nice treat. The specialty of this cake is its warm gooey molten chocolatey center! The perfect chocolate dessert in this horrible arctic winter. So, the most important variable in baking this cake is the temperature and time. Keeping temperature at a constant 350 F, it takes just a few minutes before the cake turns from molten-in-the-center to fully baked. Even if you miss the molten center, not to worry. You still end up with a perfectly baked chocolate cake!

The experiment to figure out when the center gets molten and the sides are baked; extreme left: cake is uncooked; extreme right and front: cake is completely cooked.
Ingredients:
  1. 3/4 cup all-purpose flour
  2. 3/4 cup white sugar
  3. 3 tablespoons unsweetened cocoa powder
  4. 1 teaspoon baking soda
  5. 1/4 teaspoon salt
  6. 1/2 cup vegetable oil
  7. 1 teaspoon vinegar
  8. 1 teaspoon baking powder
  9. 1 teaspoon instant coffee powder. The coffee intensifies the chocolate flavor
  10. 1 cup water

Preparation:
Mix dry ingredients together. Gently mix in all wet ingredients except vinegar. Add vinegar, stir a few times, then pour into eight 2" inch wide oiled ramekins (up to 2/3rd full) or a 9 inch buttered baking pan. Or you can use a cupcake pan. Bake at 350 F for 12 minutes if baking in ramekins, and about 10-11 minutes if using a cupcake pan. I am guessing it will take about 14-15  minutes or slightly longer when baked in a  cake pan. The center will be molten when you dig into the cake, but the top will look baked, especially the sides of the cake.

Enjoy!

Thursday, January 30, 2014

Navrathan Korma / Kurma

Navratan Korma is a dance of many flavors and spices. It is tangy, sweet, spicy and everything in between. Navratan literally means nine (nav) gems (ratan). The nine gems come in the form of eight delectable vegetables and the inimitable paneer! The vegetables include onion and tomato - the duo that graces most Indian gravies with its luscious texture and taste.

The eight veggies I used were - bell peppers (of different kinds), green peas, onion, tomato, beans, carrot, and broccoli. 
Broccoli?! - you might gasp. 
Well, why not? Potatoes are usually added instead of my insane vegetable selection, but I thought why not throw in some "good" veggie and take out the potato? But if it is unappealing to you, cauliflower is also commonly added. These days, many people add mushrooms too. But, my husband is not a fan of mushrooms, and I recently discovered that I'm allergic to some kinds. So,  I ended up using broccoli. Use any veggies that fit your fancy and that happen to be stowed away in the fridge.


Ingredients (serves 4):
  1. 1 large onion, roughly diced
  2. 1/2 green bell-pepper, cut into strips
  3. 1/2 red bell-pepper, cut into strips
  4. 200 grams paneer / 7 ounces paneer, thawed and cubed
  5. 1 small head of brocolli, broken into florets
  6. 1/2 cup carrots, cut into thick strips
  7. 1/2 cup beans, chopped into long pieces
  8. 2 tomatoes, pureed
  9. 1 tablespoon tomato paste
  10. 1/2 cup green peas
  11. 1/4 cup almonds or cashews
  12. 1 tablespoon ginger garlic paste (freshly crushed or ground)
  13. 1/2 teaspoon cumin powder
  14. 1/2 teaspoon turmeric powder
  15. 1 teaspoon dhania powder / coriander powder
  16. 2 teaspoons garam  masala 
  17. 1/2 teaspoon clove powder
  18. 1.5 teaspoons salt, or as needed
  19. 1/3 cup yogurt
  20. 1 teaspoon sugar
  21.  1/2 cup milk / heavy cream
  22. pinch of saffron
  23. 2 tablespoons raisins
  24. 2 + 1 tablespoons vegetable oil
  25. 1/4 cup cilantro / coriander leaves
  26. A squeeze of lemon juice
Preparation:
  1. Do these in parallel to save time
    1. Soak almonds or cashews in hot water for 15-20 minutes. When cool to touch, peel the almonds.
    2. Boil the onion chunks for about 10-15 minutes until they are cooked and have no raw smell. Drain the water and let the onions cool.
    3. Warm milk/heavy cream for a minute in the microwave. Add raisins and saffron to it. Keep aside
    4. Meanwhile, pan fry the paneer cubes in a tablespoon of oil until at least two sides of the cubes are golden brown. Transfer fried paneer onto a plate lined with paper towels to drain excess oil
  2. When onion is cool, grind to a smooth paste along with yogurt. Sprinkle some water if needed. Also separately grind the almond/cashews with a sprinkling of water to make a smooth paste and keep aside.
  3. Heat remaining oil in a saucepan. When hot, add the ground onion-yogurt paste and fry on low-medium heat for a couple of minutes. 
  4. Add ginger garlic paste and fry for another minute on medium heat until it doesn't smell pungent.
  5. Add turmeric powder, cumin powder, coriander powder, clove powder and garam masala and fry for a minute. Clove adds flavor and heat, plus my garam  masala has enough heat for us, so I don't add any additional chillies. 
  6. Add the pureed tomatoes and tomato paste and fry along with salt for 10 minutes on medium heat until the tomato gravy leaves the sides of the pan. 
  7. Add the vegetables (except peas) and about 1.5 cups of water (just to immerse the vegetables and make sure they cook) and cook on low-medium heat for about 15  minutes with the pan closed. Periodically check and stir the gravy to make sure it doesn't stick to the bottom of the pan. Since the vegetables cook at different times, I suggest adding carrots and beans first (with a little bit of water), make sure they get slightly tender and then add broccoli and bell pepper (with some more water) and cook them for 5 minutes or so. If you prefer, you can also steam the vegetables separately before adding them to the gravy. I just think the vegetables infuse more flavor to the gravy and also absorb more spice if they stew in the gravy without being cooked initially.
  8. When the vegetables are cooked, add the almond/cashew paste and mix well. Cook for 2 minutes. This thickens the gravy
  9.  Add milk or heavy cream (with raisins and saffron) and peas, and cook for 5 minutes on low heat. 
  10. Finally add the fried paneer, sugar and coriander leaves and give a mix.
  11. Remove from heat. Squeeze a little bit of lemon juice to bring all the flavors together.

Serve hot with rotis! This korma packs a healthy bunch of vegetables in every serving. Vegetables + flavorful curry + everyone's beloved paneer - how can it go wrong?

Wednesday, January 29, 2014

Baingan Bhartha

Baingan (eggplant) Bhartha is prepared from roasted eggplant/s. The roasted eggplant chunks are simmered in a flavorful and spicy onion-tomato curry. In India, eggplants are called brinjals. They are adorably cute looking, and way smaller and tastier than the big fat eggplants that we get here. However, this is one dish where any eggplant - tall or short, seems to work. 

This is a dish that is flavorful, smokey, and worth the time required to roast the eggplants. 


Ingredients (serves 4-5):
  1. 1 medium-large eggplant
  2. 1 medium onion, chopped
  3. 2 green chillies, chopped
  4. 2 tablespoons tomato paste
  5. 1 tomato, chopped
  6. 1 tablespoon ginger-garlic paste (or crush together equal quantities of ginger and garlic)
  7. 1 teaspoon cumin seeds / jeera
  8. 1.5 teaspoons coriander powder
  9. 1/2 teaspoon turmeric powder
  10. 2 teaspoons garam masala
  11. 2 tablespoons + a teaspoon olive oil / vegetable oil
  12. 1 teaspoon salt or as needed
  13. 1/4 cup coriander leaves
  14. 1 teaspoon lemon juice / or just a squeeze
Preparation:
  1. If you have a gas operated stove with access to an open flame, then carefully roast the eggplant (washed and dried) until the outer skin chars. Let the eggplant cool and remove the skin. Roughly dice the eggplant into bite-sized pieces. 
    1. If you don't have access to an open flame, then lightly oil the eggplant (washed and dried), place it on a cookie sheet and broil for 20 minutes on one side. Carefully turn the eggplant and broil for another 10-15 minutes until the skin withers and roasts to a dark purple. The eggplant will slightly shrink and it will give out a beautiful roasted aroma. Note that broiling this way doesn't completely blacken or char the skin. Allow the eggplant to cool and dice into chunks. I prefer to leave the roasted skin of the eggplant, because this method makes the skin crispy and flavorful without burning it. If you prefer, you can remove the skin. 
  2.  Heat a couple tablespoons of oil in a medium saucepan. Throw in cumin seeds and wait for them to sizzle. 
  3. Add onion and green chillies and saute on medium heat until translucent. Add ginger garlic paste and fry for about a minute.
  4. Add cumin powder, turmeric powder, salt, and garam masala. Fry the masalas/spices for 30 seconds or so. 
  5. Add tomato paste and mix it into the spices by frying about a minute.
  6. Add tomatoes and saute for about 10-15 minutes until the tomatoes cook well and the tomato paste starts to leave the sides of the pan. 
  7. Add the diced, roasted eggplant and mix it into the tomato and spices. Cook gently on low heat for 5-7 minutes until the eggplant has incorporated into the spices. 
  8. Add as much water as needed to bring the gravy to desired thickness and consistency. 
  9. Throw in half of the coriander leaves/cilantro, close the pan and let the gravy simmer for 5 minutes.
  10. Remove from heat, garnish with the remaining coriander leaves and a squeeze of lemon juice to just tie all the spices together.

Serve with rotis. 

Tuesday, January 28, 2014

Black-Eyed Beans Masala

I'm a fan of spice - not the kind that adds heat, but the kind that generously infuses flavor. In Indian cuisine, the bland taste of beans like garbanzo beans, kidney beans, black-eyed beans etc., is compensated by cooking them in a flavorful stew of spices. Call this stew, gravy, masala, curry - whatever it may be - I have always loved it. It's comforting, healthy and so fragrantly flavorful. This is one of those dishes that clearly demonstrates the role played by our olfactory senses in enhancing the taste and flavor of the dish.


Ingredients (serves 4):
  1. 1 cup uncooked black-eyed beans and rinsed and soaked for 8-12 hours
  2. 1 medium/large onion, chopped
  3. 2 green chillies, slit or chopped
  4. 2 tomatoes, chopped
  5. 1.5 teaspoons fennel seeds
  6. 1 tablespoon ginger & garlic paste (or crushed ginger & garlic)
  7. 1/2 teaspoon turmeric powder
  8. 1 teaspoon cumin powder
  9. 1 teaspoon coriander powder
  10. 1 teaspoon clove powder
  11. 2 teaspoons garam masala (Recommended: Rajwadi garam masala)
  12. 1.5 teaspoons salt or as needed
  13. 1/4 cup cilantro / coriander leaves
  14. a squeeze of lemon juice
  15. 2 tablespoons vegetable oil / olive oil
Preparation:
  1.  In a pressure cooker or sauce-pan, heat oil on medium heat and add fennel seeds. When the fennel begins to sizzle, add onion and green chillies and saute until onions are translucent.
  2. Add ginger garlic paste and fry for a minute.
  3. Add turmeric powder, salt, cumin and coriander powder and fry for a few seconds. 
  4. Add clove powder and garam masala and fry for a few seconds, making sure the spices don't burn. 
  5. Add tomatoes and stir/fry for 10 minutes until they become mushy. 
  6. Add rinsed and drained black-eyed beans that has been soaking for at least 8 hours, and give a stir. 
  7. Add just enough water to cover the beans and pressure cook until 4-5 whistles. If not using a pressure cooker, close the sauce-pan and let the beans cook on medium heat for 25-30 minutes or until the beans are completely cooked and can be mashed between your fingers (add more water if needed during the cooking).
  8. If the cooked gravy is too thick, add a little more water and cook for 5-10 minutes. Garnish the gravy with coriander leaves and a squeeze of lemon juice. 
Serve with rotis. 

Monday, January 27, 2014

Eggless Lime Icecream

I'm going through an online cooking course on Science & Cooking. One of the topics in class is on Phase Transitions, so the science behind how ice-cream is created is extensively discussed. As part of the lab for that week, we learned the technique behind transforming simple liquid ingredients into soft-serve ice-cream without using an ice-cream machine.

So, tada! Here's the result of my lab from that week. A simple lime flavored ice-cream. Is it as good as store bought ice-cream? Of course not! But was it good and as creamy as it could be without being churned in an ice-cream maker? Yes!

I won't bore anyone with the science behind why this technique works. But this technique is quite popular and has been used by great great grandmas all over the world to transition liquids to solids!


Ingredients (two small "soft-serve" servings):
  1. 90 grams / 1/2 cup of heavy cream
  2. 100 grams / 1/2 cup whole milk
  3. 20 grams sugar
  4. 200 grams salt
  5. 600 grams ice
  6. 2 large Ziploc bags and 1 small Ziploc bag
  7. the zest of one lime 
  8. 1/4 teaspoon vanilla extract

Method:
1. Measure the ice and salt and place them in a large ziploc bag and seal it air tight. Keep the bag in the freezer as you prepare the rest of the steps.
2. Measure the milk, heavy cream and sugar. Add them to a small ziploc bag along with vanilla extract and lime zest. Seal well and place it inside the large ziploc bag with ice and salt.
3. Place the big bag containing the ice cream mixture, salt and ice into another large ziploc bag and seal well.
4. Wear oven mitts and gently massage the ice cream mixture over the ice and salt so that the ingredients come in contact with the ice. After 10 minutes of massaging, gently remove the bag with the ice cream mixture and open it to see if the mixture has solidified slightly. If not continue the process in intervals of 5 minutes until the mixture is creamy and reaches a solid state of your liking. It took me 12 minutes to get a creamy and almost solid mixture. Spoon and scrape the icre-cream into cups and serve immediately before it melts.

Sunday, January 26, 2014

Ricotta & Spinach Lasagna

As part of an online cooking course I am taking on Science & Cooking offered by Harvard University, I had to make Ricotta at home. It was part of a lab exercise. How I am enjoying this course! It's an introductory course that breaks down the basic science behind cooking. There's a lot of high school physics and chemistry in it that my rusty brain is raking up! It feeds into my curiosity to know the "whys" and "hows" behind cooking. It literally has transformed my kitchen into a science lab, much as I have always thought of it, so it's been a great experience. I know some people don't like to view Cooking as a science, but I believe Cooking is one of the many aspects of our lives in which science and art come together beautifully. One really needs to have a basic understanding of the science to artfully create new dishes and invent new ways of recreating a classic.

Long story short, I had to make ricotta for Lab. Once I had the ricotta, I decided to make lasagna with it. Spinach and ricotta go so well together, so I put together this lasagna with the fresh and yummy ricotta and had fun through the entire experience, including eating.

Making Ricotta:

Just a brief summary on how I learned to make ricotta: I used 2 litres of whole milk (1/2 gallon). You get lots more ricotta than you would get paneer with the same quantity of milk. So 1/2 gallon gave me about 2.5 cups of ricotta. For 1/2 gallon milk, I used 4 tablespoons vinegar and 1 teaspoon salt.

Add salt to milk and continuously stir as you heat the milk. Keep heating and stirring the milk until the temperature reaches 198 F or 92 C. Remove from heat, add vinegar, mix it in quickly and place the milk (with the pan) in a bowl of ice water. Do not stir the milk. Let it sit in the ice-water bath until the temperature lowers to 97 F or 36 C. Then strain the milk through a cheesecloth and let the ricotta drain for 20 minutes to 1 hour. The ricotta was still wet after 1 hour, so I let it drain in the fridge overnight and all the whey had drained the next morning. Do not discard the whey that drains from the ricotta. You can use whey to bake breads and make rotis (substitute water with whey)


It takes time for the temperature of the milk to cool down - it took about 45 minutes. Other than that, the whole process was pretty easy and the ricotta tastes much better than store-bought ones - no surprises there. 

 Ingredients for Lasagna:
  1.  2.5 cups prepared ricotta from above
  2. 1 package oven ready Lasagna sheets that require no boiling (Barilla's Oven Ready 9 oz. Lasagna sheets are perfect for a 9x13 inch baking dish)
  3. 4 cups spinach, chopped
  4. 1 medium onion, chopped
  5. 2 cups Marinara sauce or Vodka Sauce
  6. 2 eggs
  7. 2 tablespoons butter or olive oil
  8. 1/4 teaspoon nutmeg
  9. 1 teaspoon salt
  10. 1/2 teaspoon freshly ground black pepper
  11. 1/3 cup grated Pecorino Romano
  12. 1/2 cup bread crumbs
  13. Some olive oil

 Preparation:
  1. Preheat oven to 350 F. Melt butter in a saucepan. Throw in onions and saute until translucent. 
  2. Add spinach and cook for 10 minutes or so until spinach wilts. Remove from heat and let it cool. When cool, drain all the moisture/water and keep aside.
  3. In a bowl, mix the ricotta and cooked onion-spinach.
  4. Add salt, pepper and nutmeg and mix well.
  5. Add lightly beaten eggs and mix well. 
  6. Coat the bottom of a 9 by 13 inch baking dish with some marinara sauce.
  7. Lay out about 4 lasagna sheets (if using the brand I recommended; else lay down a single layer of as many noodles as needed to cover the sauce) on top of the sauce.
  8. Spread 1/3 of the ricotta-spinach mixture on top of the first layer of noodles.
  9. Spread some of the marinara/vodka sauce on top of the ricotta-spinach mixture
  10. Lay out another layer of noodles/lasagna sheets
  11. Spread another 1/3 of the ricotta spinach mixture
  12. Spread some more sauce on top
  13. Repeat with another layer of noodles and finally lay out the last sheet of noodles. Top with a layer of sauce, bread crumbs and Pecorino Romano. Drizzle some olive oil on top.
  14. Bake at 350 F for 45-50 minutes until browned at the top and bubbling.


Rest the Lasagna for 10-15 minutes before serving.


Saturday, January 25, 2014

Thai Quinoa

Since we love peanut butter and peanut-based sauces in our household, I put together this simple dish that has a warm and tangy peanut sauce coating quinoa and some veggies. I didn't know what to call this dish, but since it is inspired from Thai (Asian) flavors, I'm calling it Thai Quinoa.


Ingredients:
  1. 1 cup uncooked quinoa
  2. 2 grated carrots
  3. 2 heads of broccoli, cut into florets
  4. 1/2 red onion, chopped
  5. 1/4 cup roasted peanuts
  6. 1/2 cup peanut butter
  7. 2 teaspoons grated ginger
  8. 1/4 cup soy sauce
  9. 1 tablespoon honey
  10. 1 tablespoon vinegar
  11. Juice of 1 lime
  12. 2 tablespoons sesame oil
  13. 1/4 cup chopped cilantro / coriander leaves
Preparation:
  1. Cook the quinoa with 2 cups of water until done. 
  2. Heat sesame oil in a skillet. Add onion and saute until translucent. Add the carrots and broccoli and saute and cook for another 10 minutes until carrots are soft and the broccoli is slightly crisp. The vegetables don't have to be completely cooked.
  3. Make the sauce - in a bowl, whisk together peanut butter, soy sauce, vinegar, honey and ginger. 
  4. When the quinoa is done, pour the sauce over the warm quinoa and mix well.
  5. Add the vegetables to the quinoa and stir. 
  6. Finally add lime juice and cilantro, give a gentle toss and serve with a sprinkling of roasted peanuts.

 A yummy and healthy meal. 

Friday, January 24, 2014

Paalak Aloo Methi

If leafy greens are not appetizing by themselves, then what do we do? We throw in flavor, spice, and everyone's favorite - potatoes! 

That's exactly what this dish is all about - a flavorful stew of spinach and dried fenugreek leaves (methi) with some cubes of potato.


Ingredients (serves 4):
  1. 2 potatoes, boiled and peeled and cubed
  2. 1 red onion, chopped
  3. 3 cloves
  4. 3 pods of green cardamom
  5. 1 tablespoon ginger garlic paste (equal quantities of ginger and garlic)
  6. 2 tomatoes, chopped
  7. 2 tablespoons of kasurimethi (dried fenugreek leaves)
  8. 1.5 teaspoons salt or as needed
  9. 2 teaspoons coriander powder / dhania powder
  10. 3 green chillies
  11. 5 cups spinach, roughly chopped
  12. 1 teaspoon sugar
  13. 1/4 cup milk
  14. 2 tablespoons vegetable oil / olive oil
Preparation:
  1. Cook spinach along with green chillies in 1/4 cup of water until spinach wilts and cooks - about 10 minutes or so. Let it cool. When cool, grind to a smooth paste.
  2. Heat oil in a medium-large saucepan. Add cloves and cardamom and fry on medium heat until aromatic.
  3. Add onion and saute on medium heat until translucent.
  4. Add ginger garlic paste and fry for another minute.
  5. Add tomatoes, kasurimethi and salt and satue till tomatoes are mushy.
  6. Add coriander powder / dhania powder and cook for another 5 minutes.
  7. Add the ground spinach mixture and stir well. Add a teaspoon of sugar, mix well and cook closed for 10 minutes, stirring every now and then.
  8. Add potatoes, and a little more salt if required and cook closed on low heat for another 5 minutes.
  9. Add milk, stir well and cook closed on low heat for another 5 minutes.
Remove from heat and serve with rotis or rice!

Thursday, January 23, 2014

Shahi Paneer

Ah, finally! It took many attempts and perseverance to get this right! I don't know if it is still "right" according to experts, but for the humble home cook, this is a pretty decent replica of the real shahi paneer.

Shahi Paneer is yet another creamy paneer dish that is incredibly flavorful. My husband has a love affair with it. No matter which Indian restaurant he steps foot into, Shahi Panner has to be part of the order. It just has to. After enduring his many snide comments like, "How come you never make this?" or "How come your shahi paneer tastes no where close to this?", I am so glad that this recipe comes A-Approved.

This recipe has no tomatoes and no turmeric powder. It is pale and creamy and sweet and spicy. My cousin was recently describing a shahi paneer that she had in India. With her face shaded in a blissful aura, with half-closed eyes and a honeyed tone, she told me how wonderfully magnificent it tasted. She told me it was white and creamy and had tutti-fruity (small pieces of fruit jelly) in it. She has been trying to recreate that particular dish, but despite her many attempts, she says she hasn't been able to get the taste of the real deal. And that boggles me. But, being the awesome cook that she is, she gave me some pointers from her attempts. I hungrily noted them down, added my own spin, and tried this version. As satisfied as I am (mainly because of the husband's approval) with this version of mine, my cousin is still not satisfied and is madly experimenting... so I can only imagine how fantastic the original tasted.


Ingredients:
  1. 14 ounces or 400 grams of paneer, cubed
  2. 1 medium-large onion, sliced
  3. 4 cloves
  4. 5 pods of cardamom (green cardamom)
  5. 1 inch piece of cinnamon
  6. 1 tablespoon ginger-garlic paste(grind equal amounts of ginger and garlic)
  7. 2 teaspoons garam masala
  8. 10 almonds
  9. 1/2 cup thick yogurt
  10. 1/2 cup milk (or half & half or cream)
  11. A generous pinch of saffron
  12. 1.5 teaspoons salt or as needed
  13. 1/2 teaspoon sugar
  14. 2 tablespoons raisin (instead of tutti-fruity; If you have some, please use them)
  15. 1/4 cup coriander leaves/cilantro
  16. 1 tablespoons vegetable oil
Preparation:
  1. Soak almonds in hot water for 20 minutes. Drain the water, remove the peels and grind to a smooth paste with just enough water as required.
  2. Warm the milk for 1 minute in the microwave and add saffron and raisins to it. Let it sit for at least 15 minutes.
  3. Heat 1 tablespoon of vegetable oil in a skillet. When hot, add onion and fry on low-medium heat for 15 minutes or longer until the onions are caramelized and crispy. Remove from heat, cool and then grind with a sprinkle of water to make a smooth paste.
  4. Heat the remaining oil in a medium-large saucepan. Add cardamom, cloves and cinnamon and saute for a few minutes until the spices are aromatic. 
  5. Add the ground onion to the spices and saute for 2 minutes on medium heat. 
  6. Add ginger garlic paste and fry for a minute. 
  7. Add garam masala and mix everything together for an additional minute.
  8. Add the almond paste and salt and cook everything on low-medium heat for 5 minutes, stirring every so often making sure the masala doesn't stick to the pan.
  9. Add yogurt, mix well and continue to cook stew for 5-7 minutes until the gravy is thick.
  10. Add the milk mixed with saffron and raisins. Stir everything and let it stew for 5 more minutes.
  11. Remove from heat. Add the cubed paneer and sugar gently stir in. Garnish with coriander leaves/cilantro.
If possible, let the paneer marinate in the gravy for at least 30 minutes before serving. It tastes great even otherwise! The flavors intensify as the gravy sits. An ideal leftover dish!

My husband was initially very skeptical of this dish because it doesn't look like the one in restaurants, so don't let the color fool you! Also, I added no heat in the form of chillies or chilli powder. So if you want, grind green chillies along with onions or add some chilli powder.

Wednesday, January 22, 2014

Cabbage Korma / Kurma

It does seem like I am obsessed with cabbage, given how the recent trend of recipes has involved a lot of cabbage. Every time I buy a head of cabbage, I have a feeling that parts of it always seem to sit around in the fridge for 10 days or more... and that's when I panic. In any given week, how many times can you make cabbage stir fry/curry and kootu? And they are so deceptive in size. Even a medium sized cabbage turns into several cups of chopped cabbage when unfurled, and they last forever in the fridge!

I am guessing I am not the only one who faces this conundrum with cabbage. So, I have been trying to add cabbage in dishes that normally don't have cabbage in them. Like kurma or korma. It is a spicy gravy made from fragrant spices. They are perfect sides for rotis, parathas and even dosas.

So, this is my version of korma with cabbage.


Ingredients: 
  1. 3 cups finely chopped cabbage
  2. 1 onion, chopped
  3. 2 tomatoes, chopped
  4. 2 cloves of garlic
  5. 1 inch block of ginger
  6. 3 teaspoons fennel seeds
  7. 5 pods of green cardamom
  8. 4 cloves
  9. 2 teaspoons poppy seeds (the white ones) / kasa kasa
  10. 2 tablespoons shredded/grated coconut
  11. 2 dry red chillies
  12. 1.5 teaspoons salt or as needed
  13. 2 + 2 tablespoons olive oil / vegetable oil
  14. 1/2 teaspoon turmeric powder
  15. 1/4 cup chopped coriander leaves/ cilantro
  16. 10 almonds (or cashews)
  17. 1/2 teaspoon brown/black mustard seeds
Preparation: 
  1. Soak the almonds in hot water for 20 minutes. Remove the skin and grind to a smooth paste with just enough water.
  2. Heat 2 tablespoons oil in a pan. When hot, splutter mustard seeds and add the cabbage. Cook the cabbage on low-medium heat until almost done (about 15 minutes). Set aside.
  3. Grind together - tomatoes, ginger, garlic, fennel seeds, 3 pods of cardamom, 2 cloves, poppy seeds, red chillies, and coconut with just enough water to make a smooth paste.
  4. Heat 2 tablespoons oil in a medium-large saucepan. When hot, add the remaining cardamom (2) and 2 cloves and fry for a minute until aromatic. 
  5. Add onion and fry on medium heat until translucent. 
  6. Add the ground mixture from step 3 (the spice/masala mixture) and turmeric powder and fry on medium heat for 10 minutes or so until the raw smell of the spices dissipate and the mixture thickens a little. 
  7. Add some water (about 1/2 cup) and add the almost done cabbage and salt and stir well. Close the lid and simmer on low heat for 10-15 minutes, stirring every now and then, and adding more water if required.
  8. Finally, when the cabbage is fully cooked, add the almond paste to thicken the gravy. Stir well and cook for 5 minutes.
  9. Remove from heat and garnish with coriander leaves/cilantro
Serve alongside rice or roti!

Tuesday, January 21, 2014

Cilantro Quinoa Pulao

Quinoa has become such a popular substitute for rice. We directly substituent rice with quinoa and have everything with quinoa - sambar, rasam, kottu, kuzahmbu, curry, gravy, yogurt, spice powders... you name it. I also (like several others) directly substitute rice with quinoa in flavored rice dishes like pulao/pulav/pilaf etc. 

Coriander/cilantro rice is quite popular in India. There are several variations to it, of course, but it basically involves flavoring and cooking rice with an aromatic mixture of ground cilantro, spices, and coconut. So, that's where my inspiration came while making this dish. This dish is essentially cilantro pulao with quinoa instead of rice, and flavored with coconut oil instead of vegetable oil, because coconut oil has managed to sneak in to the coveted list of health foods.


Ingredients (serves 2-4):
  1. 1 cup uncooked quinoa
  2. 1/2 cup chopped cilantro / coriander leaves
  3. 1 inch block of ginger
  4. 2 cloves of garlic
  5. 1/3 cup shredded/grated coconut
  6. 1 dry red chilly or 1 green chilly
  7. 1 tablespoon coconut oil
  8. 2 pods of green cardamom
  9. 3 cloves
  10. 1 inch piece of cinnamon
  11. 1 medium onion, sliced
  12. 3 carrots, peeled and chopped
  13. 1 teaspoon salt, or as needed
  14. 2 tablespoons of peanuts
Preparation:
  1. Grind the coconut, ginger, garlic, and coriander leaves with a couple of tablespoons of water to form a coarse paste.
  2. Heat coconut oil in a medium sauce pan. When hot, add cardamom, cloves, cinnamon and peanuts and fry for a minute until you can smell the spices. Add onion and saute on low-medium heat for 5 minutes. 
  3. Add carrots and saute for another 5 minutes. (add more vegetables as you like)
  4. Add the ground cilantro-coconut mixture and fry for another couple of minutes
  5. Add quinoa and salt and mix well. Add 2 cups of water and stir well and let it come to a boil. When it comes to a boil, reduce the heat to low and simmer for 15-20 minutes with the saucepan closed until the water is absorbed and the quinoa is cooked
  6. Remove from heat, garnish with more cilantro if you like and serve.
Serve warm. Enjoy!

Monday, January 20, 2014

Szechuan Noodles

These Noodles are Asian inspired, complete with peanut, soy sauce, ginger, garlic and sesame coming together to create a bold and rich flavor. The husband is a fan of peanuts, peanut butter and peanut-based sauces, and I am a fan of Asian sauces, so this is a popular dish at our household when we are strapped for time and crave for something flavorful.


Ingredients (serves 4):
  1. 1 pound whole wheat spaghetti
  2. 4 cloves of garlic, roughly chopped
  3. 1/4 cup roughly chopped ginger
  4. 1/3 cup vegetable oil
  5. 1/4 cup sesame seeds (white) + some more for garnish
  6. 1/2 cup peanut butter
  7. 1/2 cup soy sauce
  8. 1/4 cup honey
  9. 1/3 cup vinegar
  10. 1/4 water
  11. 2 tablespoons sesame oil
  12. 2 red bell peppers, cut into strips
  13. 2 grated carrots
Preparation:
  1. Heat sesame oil in a skillet. When hot, add grated carrots and saute for 5 minutes until soft. Next, add the bell peppers and saute on medium heat for another 5-10 minutes. 
  2. Prepare the sauce - throw the ginger, garlic, vegetable oil, sesame seeds, peanut butter, soy sauce, honey, vinegar, and water into a food processor or blender and grind to a smooth paste. Taste and adjust the sauce flavoring by adding honey (if it's too tangy or sharp) or vinegar (if it is missing some zing).  If the sauce is too thick, add a little water or oil to dilute it to your desired consistency.
  3. Cook the spaghetti or pasta as per directions on the box and drain the water. Add 1/2 of the sauce to the hot spaghetti and mix/toss together. Add the sauteed vegetables and toss once more. Add 1/4 of the sauce  (or as needed) and toss again. 
  4. Serve with toasted sesame seeds. Reserve some sauce on the side if you are going to reheat/reserve the noodles at a later time because the noodles absorb the sauce as it cools, so within a couple of hours it will look dry.
Really flavorful noodles with crunch and zing!

Sunday, January 19, 2014

Moong Dhal Tikki / Mung Bean Tikki

Tikki or cutlets are deep-fried/pan fried spicy patties. They are popularly prepared with mashed potatoes and Indian spices and are called Aloo Tikkis. The fried potato patties are as popular as Samosas are as party and tea-time appetizers in India.

I never would have thought to make tikkis with lentils or dhal (although now that I think about it, it is like making masala burgers!), until I came across a lovely recipe that used moong dhal instead of potatoes, and oats instead of bread crumbs to crisp the tikkis. And after trying, tasting and testing the tikkis on friends, I can say that nobody could guess that the tikkis were made with plain old dhal and not potatoes! They taste really good, are healthier than potato tikkis and are perfect as an appetizer that doesn't allow guilt to creep in.


Adapted and tweaked from this recipe
Ingredients (serves 4):
  1. 1/3 cup uncooked moong dhal /payatham paruppu / yellow mung beans
  2. 1 cup oats
  3. 1/2 a medium-large red onion, finely chopped
  4. 1 teaspoon minced ginger
  5. 1 green chilly, finely chopped
  6. 1 teaspoon coriander powder
  7. 1 teaspoon garam masala or pav bhaaji masala
  8. 1/2 teaspoon turmeric powder
  9. 4 tablespoons (and a few extra teaspoons) vegetable oil, or as needed
  10. 1/4 chopped coriander leaves / cilantro
  11. 1/4 - 1/3 cup buttermilk or diluted yogurt (as needed)
  12. 1.5 teaspoons salt or as needed
Preparation:
  1. Cook the moong dhal with just enough water to complete cook the dhal until mushy. If there is any extra water, drain it from the cooked dhal and let it cool. When cool, pulse in a blender until the dhal is broken down. Do not add any water.
  2. Grind 1/2 cup of oats. Add this to the cooked & pulsed dhal along with chopped onion, ginger, green chilly, garam masala/other masala, turmeric powder, salt, and coriander leaves and mix everything well. Try to form small discs/patties that hold together. If you are unable to form patties, grind some more oats and add to the mixture until you can form patties. 
  3. Create an assembly line to pan fry the patties/tikkis. Heat a teaspoon of oil in a skillet (cast-iron ideally). Dip the patties in buttermilk/yogurt, roll it around in the remaining 1/2 cup of oats that is coarsely ground (just pulse a couple of times in the blender) and pan fry on either sides until golden brown. Replenish the skillet with oil and pan fry all the patties. Note: for most of the tikkis, I didn't need to dip in buttermilk/yogurt to coat them in coarsely ground oats. The patties were moist enough by themselves for the oats to attach to their exterior. So, dip in buttermilk/yogurt if required.
  4. Remove and drain on paper towels. Keep the fried patties in a warm oven (200 F or less) until ready to serve. 

Serve with tomato ketchup or a favorite sauce of your choice. 

Saturday, January 18, 2014

Paruppu Thogayal / Thuvayal

Paruppu Thogayal/thuvayal is a South-Indian side-dish that can be described as thick lentil chutney that is ground with red chillies, lots of black peppercorns and a pinch of asafoetida. It is simple, it's deceptively tasty, healthy, and such a comfort food!


Ingredients (serves 2-4):
  1. 1 cup uncooked thoor dhal / yellow lentils / thuvaram paruppu
  2. 1 red chilly (add more for a spicy version)
  3. 1.5 teaspoons black pepper corns
  4. 1/4 teaspoon hing / asafoetida
  5. 1 teaspoon salt
  6. 1.5 tablespoons vegetable oil / olive oil
  7. 1/4 cup water or as needed to grind the thuvayal
Preparation:
  1. Heat oil in a medium sized skillet
  2. When hot, add red chilly, peppercorns and hing and fry on medium heat for a minute.
  3. Add thoor dhal and fry on medium heat until the dhal begins to slightly change color to an orangish shade. Remove from heat and cool.
  4. When cool, grind the dhal with salt, by slowly adding water as needed to grind the thuvayal to a slightly coarse paste. Adjust the quantity of water as needed to get the thuvayal to your desired consistency. The thuvayal should be thicker than chutney in consistency. 

Serve with rice mixed with some ghee/clarified butter or sesame oil. Such a yummy comfort food with Vatha Kuzhambu

Friday, January 17, 2014

Lemon Rasam

Lemon Rasam is a variation of lentil soup without the need for adding tamarind to make it tangy. I find it less time consuming because I don't have to worry about soaking tamarind, extracting the pulp etc. Even one less step seems to be a time saver on weeknights. 

Since we love lemony, citrusy flavors, I am always keen on making sure the lemon flavor comes through. Some lemon rasams don't have any hint of lemon in them because the juice just imparts its tartness and disappears amid the other spices. The lemons in the U.S are notoriously low in flavor (especially their juice) when compared to the brightly flavored smaller ones we get in India. So, I add some lemon zest to the rasam to amplify its flavor. So depending on your lemons, either add/avoid the lemon zest and adjust the amount of juice that you finally add.

This is a bright and refreshing rasam.


Ingredients:
  1. 1/4 cup raw toor dhal / yellow lentils / tuvaram paruppu, cooked until mushy
  2. 2 small-medium tomatoes, chopped
  3. 2.5 cups water
  4. 2 teaspoons grated/crushed ginger
  5. 1 green chilly, crushed
  6. 2 teaspoons rasam powder
  7. 1/2 teaspoon turmeric powder
  8. 1 teaspoon salt, or as needed
  9. 1 teaspoon brown sugar / jaggery
  10. 1 teaspoon ghee / clarified butter
  11. 1/2 teaspoon black mustard seeds
  12. 1/2 teaspoon jeera / cumin seeds
  13. 1/4 teaspoon hing / asafoetida
  14. handful fresh coriander leaves / cilantro, chopped
  15. 3-4 tablespoons lemon juice (depending on how tart the juice is)
  16. 1 teaspoon lemon zest (just the yellow portion) / or a few slices of lemon (optional, but recommended to infuse more lemon flavor)
Preparation:
  1. In a medium saucepan, bring to boil - water, tomatoes, crushed ginger, green chilly, rasam powder, turmeric powder, salt and lemon zest (if adding). Boil for 10 minutes or so on medium heat until the tomatoes are cooked and the spices don't smell raw
  2. Add the cooked dhal/lentils to the rasam and stir well. Continue to cook the rasam on low-medium heat for 10 minutes until the corners of the rasam bubble and froth slightly. 
  3. Remove from heat, add lemon juice and stir well. Mix in the brown sugar or jaggery. Taste and adjust seasonings - salt and/or lemon juice. If it tastes too tart, add a little more brown sugar.
  4. Heat some ghee in a pan. When hot, splutter mustard seeds, add jeera/cumin seeds and hing. Mix for a few seconds and add it to the rasam. 
  5. Garnish with cilantro. If you are adding lemon slices, add them now and take them out within 20-30 minutes. The lemon slices infuse more flavor to the rasam, but the white pith in the rind quickly turns the rasam bitter, so remember to remove them soon.
Serve with warm rice. 

Thursday, January 16, 2014

Orange Peel Vatha Kuzhambu

Orange Peel is popularly used in many cuisines, and South Indian cuisine is no exception. We make a sweet, tangy and slightly bitter sauce with it (also called as pachidi), and use the dried peel powder in flavorings. My mom recently experimented by making a Kuzhambu (a tangy and spicy gravy) with orange peel and she said the dish tasted really good and unique.

So, upon her successful experiment, I took down her recipe and tried it. True to her word,  it truly is unique tasting, for who has tried orange flavored kuzhambu? It is incredibly flavorful if you are a fan of oranges. Both my husband and I loved the kuzhambu. I must say, there was no hint of bitterness despite me not removing the white pith from the orange peel. I think stewing it in tamarind (and some jaggery/brown sugar) eliminated the bitterness. It was spicy and orangey with a trace of lingering sweetness! Highly recommended.


The recipe is very similar to a standard Vatha Kuzhambu, with just a few tweaks and additions.

Ingredients (serves 4):
  1. About 2 inch ball of tamarind (depending on how tart the tamarind is; 2" is usually sufficient). 
  2. the peel of 1 orange - cut into pieces (comes to 3/4 cup)
  3. 1 tablespoon olive oil / vegetable oil
  4. 1 teaspoon black mustard seeds
  5. 1 teaspoon bengal gram dhal / kadala paruppu / channa dhal
  6. 1/2 teaspoon fenugreek seeds
  7. 1 tablespoon ghee / clarified butter (optional)
  8. 2 teaspoons jaggery / brown sugar
  9. 1 dried red chilli (do not add if you want it mildly spiced)
  10. 2  - 2.5 teaspoons sambar powder
  11. 1 teaspoon turmeric powder
  12. few curry leaves
  13. 1 tablespoon rice flour/rice powder (sometimes besan is used instead of rice flour)
  14. 1/8 teaspoon hing / asafoetida
  15. 1 teaspoon salt (or as needed)
Preparation:
  1. Soak the tamarind in 2 cups of hot water for 20 minutes. Squeeze the juice out of the pulp and drain the tamarind extract. Repeat the process by adding 1 more cup of lukewarm water to the remaining pulp and extract more juice. Repeat a third time if you think the pulp can be juiced more. Discard the pulp.
  2. Heat oil in a medium-size saucepan. When hot, splutter mustard seeds, and then add fenugreek seeds, hing, gram dhal and curry leaves. Fry for a few seconds. 
  3. Add the orange peel and saute on medium heat for 5 minutes.
  4. Add turmeric powder and sambar powder and fry the spices for a couple of minutes.
  5. Add the extracted tamarind juice, an additional 1 cup of water and salt, and let the whole thing boil on medium heat (uncovered) for 35-40 minutes until the mixture reduces in quantity and becomes concentrated. Add more water (if needed) and if you think it tastes too tart. 
  6. Add jaggery/brown sugar (to balance the tartness)
  7. Mix rice flour in 1.5-2 tablespoons water and mix well. Whisk into the kuzhambu to thicken it. Reduce the heat, and simmer the kuzhambu on low heat for 5-10 minutes until it thickens. Add more rice-flour-paste to thicken the kuzhambu more (if needed). 
  8. Remove from heat and mix a dollop of ghee (optional but recommended)
 Enjoy with steaming rice and vegetables on the side!

Wednesday, January 15, 2014

Vegetable Manchurian

During the crazy Arctic freeze and blizzard of last week when everyone was huddled indoors, I took a break to make these manchurians. Usually, a gloomy weather is an excuse for making fried foods such as bajji and pakoda. They warm you up and make you forget the calories for a while. Since my husband had been asking for manchurians lately (and since I love them too), I decided to try and make some.

This is just my mish-mash version of machurians. Manchurians are popular in India and are hailed as Indo-Chinese delicacies. However, most Chinese people don't regard Manchurians as Chinese food. It has some soy sauce and Chinese chilli sauce in it, so perhaps that's why it's referred as Indo-Chinese. 

So what are manchurians, you might ask. They are crispy fried nuggets of vegetables (popularly cauliflower florets) that's tossed in a spicy and flavorful Asian sauce consisting of soy sauce, ginger, garlic, brown sugar, tomato sauce, chilli sauce and scallions. They make extremely addictive appetizers and finger foods. 

I added no heat to this version. No chillies, no chilli sauce, because we are not fans of heat. Plus, I didn't have any chillies or chilli sauce... and venturing out to get them in a polar blizzard didn't seem wise. So add as many chillies as you would like, if you decide to try this recipe. The manchurians were flavorful for sure and tasted quite close to the real deal.

Ingredients (serves 2):

For the manchurians (makes 14)
  1. 1 cup shredded cabbage
  2. 1 green bell-pepper, finely chopped (comes to 1 cup)
  3. 2 tablespoons besan / kadalai maavu / bengal gram dhal flour
  4. 3 tablespoon rice flour
  5. 1 teaspoon soy sauce
  6. 1 teaspoon salt or as needed
  7. 1 teaspoon pepper
  8. 1 tablespoon of equal proportion of minced garlic and ginger
  9. 1 tablespoon chopped scallions 
  10. 4-5 cups vegetable oil for deep frying
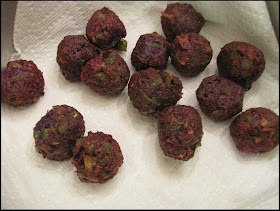
the manchurians seem really dark because I used purple cabbage
For the Sauce
  1. 2 tablespoons sesame oil
  2. 3 pods of garlic, minced
  3. 1 teaspoon minced ginger
  4. 1/4 of a medium red onion, minced
  5.  3 tablespoons tomato ketchup
  6. 1 tablespoon soy sauce
  7. 2 teaspoons vinegar / rice wine vinegar
  8. 1.5 teaspoons honey
  9. salt as needed (be wary of the soy sauce)
  10. Some coriander leaves/cilantro for garnish
Dipped in sauce
  Preparation:
  1.  In a bowl, mix the cabbage, bell pepper, ginger, garlic, scallions, salt and pepper. Add soy sauce and mix. Add besan, rice flour and all-purpose flour and mix. The addition of flour should enable you to make small fritter sized balls that hold shape and form. If you are unable to form balls, sprinkle some more besan or rice flour and try again. Adding rice flour makes the manchurians crispy. (note: I did not drain water from the vegetables, especially the cabbage)
  2. Form balls and deep fry them to golden brown. Fry them on medium heat making sure the outside doesn't fry before the insides are cooked. That is, slowly fry them to a golden brown. Drain on paper towels. 
  3. Make the sauce.
    1. Heat sesame oil and add onion and saute until they are translucent. 
    2. Add garlic and ginger and fry on medium heat for a minute or two. Remove from heat.
    3. In a bowl, whisk together - tomato ketchup, soy sauce, honey, vinger and salt (if needed). 
    4. Add the sauted onion, garlic, ginger (along with any sesame oil in the pan) to the sauce and mix well. 
  4. Now, take each manchurian and dip/roll it in the sauce and take out. After repeating this for each manchurian, pour the remaining sauce evenly on the manchurians and serve with a garnish of coriander leaves and scallions (if you have any). 
Serve immediately. You can carefully skewer each manchurian on a tooth pick and lay them out as finger food. Enjoy before the manchurians become soft!

Tuesday, January 14, 2014

Eggless Lime & Ginger Cake

On a certain day at the grocery store, I couldn't find any individual limes. So, I got a big bag of limes to make some salads and juices. But after numerous salads and juices, the limes were still aplenty. My husband was constantly fretting over the limes going bad and kept subtly suggesting that I make something sweet with them - perhaps a cake or a cupcake? Hint received.

When the holidays rolled around and I had some time on my hands, I tweaked my lemon cake recipe to prepare this version of a lime & ginger cake.

The limes I had were unusually sweet and not as tart as usual. They were quite mild, actually. So check the tartness and sweetness of your limes to adapt the measurements as required.

Ingredients:
  1. 1.5 cups all-purpose flour
  2. 1 cup sugar
  3. the zest of 3 limes
  4. 1.5 tablespoons lime juice
  5. 1 tablespoon of grated ginger
  6. 1 teaspoon baking soda
  7. 1/2 teaspoon salt
  8. 1 cup milk (2% is fine)
  9. 1/3 cup vegetable oil
Glaze: 
  1. 1/4 cup lime juice
  2. 1 tablespoon sugar
  3. the zest of 1 lime
  4. 1/2 teaspoon powdered ginger 
Preparation:
  1. Prepare dry ingredients: Sift and mix - flour, baking soda and salt. Mix sugar into it.
  2. Prepare wet ingredients: Whisk lime zest and grated ginger with milk. Add oil and mix/whisk.
  3. Slowly add/fold dry ingredients into the wet ingredients. 
  4. Finally stir in the lime juice. 
  5. Pour batter into a buttered 9 inch cake pan. Bake at 350 F for 30-35 minutes until a tester comes out clean.
  6. For the glaze:
    1. Mix lime juice and sugar and heat for 5-7 minutes until sugar is dissolved and the syrup is warm. Stir in powdered ginger to the syrup.
Let the cake cake cool for 15 minutes. Since I didn't want the glaze to upstage the ginger by turning the cake too lime-y, I didn't let the cake steep in the glaze.


Serve by drizzling some of the glaze on top of the cake and sprinkling some lime zest on top. Lime and ginger make a lovely pairing. Enjoy!

Monday, January 13, 2014

Cocoa Cola Cake

Cocoa cola cake? As in Cola flavored cake? Coke Cake?

Maybe you're intrigued with the name of the cake and are mentally asking those questions, or maybe you are not. I sure was! I came across this cake in some book at some point. It caught my interest and I had made a note to look in to this cake at some point. That "some point" came in the guise of a friend's birthday gathering last month. I offered to bake the cake, and while pondering on what to explore this time, I remembered this cake.

This cake is popular in the south (southern United States). Much to my surprise and mild disappointment, the cake doesn't taste like coke (despite the claims made by some recipes) nor is it cola flavored. That said, this is one delish cake. It is extremely moist and soft - the moistest cake I have ever baked, and extremely fluffy, light and tender, thanks to the carbonated cola that does all the leavening action. Although the cake doesn't taste like cola, it tastes good and sort of unique. Despite the addition of cocoa, it is not chocolatey. It has a subtle caramel and cocoa flavor.

Everyone at the party loved this cake so much that they demanded that I re-bake the same cake for our New Years' party. I didn't expect it to be that popular! I wanted to tweak the recipe to infuse some cola flavor, but nobody wanted me to mess with the recipe - they all wanted the exact same cake! So no experimentation for a while... wonder what occasion I can concoct to bake a revised version of this cake - I have some ideas to make it taste coke-like, but let me not confidently divulge it before experimenting! If you have any suggestions, please share!

As is my obsession, I browsed through tonnes of recipes for coco(a) cola cakes and I realized that they are all pretty much the same... same set of ingredients and quantities except for a couple of deviations in the procedure. So, I eventually settled on this recipe because it promises that the cake would taste Coke-like. But it does not :( 

Thoughts on the recipe:
Note that the recipe calls for a lot of sugar. So I cut down the sugar to 1.5 cups (from 2 cups) to prepare the cake. I also used regular Coke, not diet Coke.

Also, while everyone loved the cake, I was not a fan of the frosting - it was again way too sweet for my liking. However, most people loved the frosting as well, so it's a matter of personal preference.
Personally, I would halve the frosting recipe or cut down the sugar to probably half the amount. It might throw off the consistency of the frosting, so this is one other place where some experimentation is required. I also cut down on the cocoa added to the frosting (I added just 1 tablespoon), because I desperately wanted the Coke flavor to come through. Didn't help, though.

And a final note on the recipe - the only difference between this recipe and most other recipes is how the Coke is treated. This recipe calls for heating/boiling the Coke with butter and cocoa, for both the cake batter and frosting. Not sure why it has to be heated... maybe it helps make the cake more moist, but I suspect it also interferes with imparting the cola flavor... how I wish I could spend a day just experimenting on all the different variables!

Anyway, all that analysis later, here's how the cake looks!
Tada!
Fresh from the oven with the marshmallows poking out

with the sweet and warm frosting

Sunday, January 12, 2014

Eggless Apricot & Pear Crumb Cake

My husband and his family have a dog back home in India. Today is his birthday, and a milestone one at that! So here's celebrating the loyal pet that fears nothing except thunder and lightning.

Bhairav, giving his "don't mess with me" look :)
Although Bhairav and I have a predator-prey kind of relationship (me being the meek prey that runs for her life, of course), I have been regaled with several stories of him stealthily stealing mangoes and food from the kitchen, so he is a foodie himself. And what more, as a true member of the family, he also loves all things sweet! On our birthdays and special occasions, my mother-in-law prepares yummy sweets like burfi and halwa, and sensing the lovely aroma wafting from the kitchen, he will poke his head through the window and demand that he get a share :). So on our birthdays, it is Bhairav that gets to eat the delicacies in India. This time, as a reversal of how things are done, I baked a cake on Bhairav's birthday, so that we get to celebrate and vicariously eat on behalf of him ;)

 "Hey! What's cooking?"
Bhairav loves sweet fruits like mangoes and jackfruits (his favorite), so I wanted to bake a fruit-based cake. I decided to use pears because the husband was certain that Bhairav would relish pears. In addition to pears, I also added some apricot preserves because I was sure Bhairav wouldn't complain if I added an extra bit of fruit and sweetness. To do something slightly different, I baked a crumb cake with a soft and sweet base and a crunchy exterior. And it was a successful experiment!

Ingredients:

For the Cake
  1. 1/2 stick unsalted butter, at room temperature
  2. 1 cup all-purpose flour
  3. 1/2 cup sugar
  4. 1 teaspoon baking powder
  5. 1/4 teaspoon salt
  6. 1 tablespoon ground flax seed + 3 tablespoons water, whisked together (as an egg substitute)
  7. 1/2 cup yogurt
  8. 1 teaspoon vanilla extract
  9. 1 1/4 cups chopped pears (I used Bartlett pears)
  10. 3 tablespoons + a few dollops of apricot preserves / jelly/jam
Crunchy topping
  1. 1/4 cup all-purpose flour
  2. 1/4 cup dark brown sugar
  3. 1/2 stick cold butter, cut into pieces
  4. 1 cup coarsely ground almonds
  5. 1 teaspoon cardamom powder 
Preparation:
  1. Preheat the oven to 350 F. Butter and flour a 9 inch cake pan
  2. Warm the flax seed mixture in a microwave for 30 seconds. Take it out, whisk well (it will start to become thick and gloopy) and let it rest for 10 minutes
  3. Sift the flour, baking powder and salt and keep aside
  4. Beat butter for a minute. Then add sugar and continue beating for about 3 minutes until soft and creamy
  5. Add the flax seed mixture (it would have become viscous and eggy by now) and beat until incorporated.
  6. Add yogurt, vanilla extract and beat until incorporated.
  7. Add apricot preserves and stir gently into the batter.
  8. Add the dry ingredients and gently fold into the wet ingredients.
  9. Finally, add the pears and give the batter a gentle mix. The batter will be thick. Transfer the batter into the baking pan.
  10. Prepare the topping
    1. Using your hands, mix brown sugar, cardamom and flour. 
    2. Add butter and using your hand or a fork crumble and mix the butter into the flour mixture until the butter is the size of peas. Remember the butter should be cold, so you have to work it in to the flour
    3. Add the coarsely ground almond and give a final mix.
  11. Spread/pile the topping on top of the batter
  12. Finally, spoon a few dollops of apricot preserves onto the crunchy topping
  13. Bake for 45-50 minutes until a tester comes out clean. I actually baked for 52 minutes, if that counts.
Before baking
Let the cake cool. When cool, cut into pieces and serve! Do not try to invert this cake from the pan.
Fresh out of the oven
The cake itself doesn't rise because the crunchy topping would then fall apart. It is a soft and moist cake studded with pears in every bite - if you notice, I added more pears than even flour. So the cake is predominantly structured by pears. The topping is my favorite - it is crispy and flavorful and not too sweet. 

Animals have a unique sixth sense. I hope Bhairav senses this gesture of mine and will be appeased by it sufficiently to not want to maul me the next time I meet him! I hope we have a deal ;). 


Happy Birthday Bhairav. May you have many more happy and healthy birthdays!

Saturday, January 11, 2014

Pooshnikai Mor Kootu

My mom makes this kootu (gravy) often. She prepares this with coconut thogayal/thuvayal (a variation of spicy coconut chutney) and together they make an awesome combination. This is one of her most well known, well received go-to dishes.

It is so simple to make and extremely tasty!


Ingredients:
  1. 1 cup of diced pooshnikai (white Indian pumpkin) or chow-chow (and Indian squash) or any other squash, gourd or pumpkin
  2. 1/4 cup grated coconut (unsweetened)
  3. 2 green chillies
  4. 1 teaspoon salt
  5. 1.5 cups yogurt
  6. 1 tablespoon coconut oil
  7. 1 teaspoon black mustard seeds
  8. 1/2 teaspoon jeera / cumin seeds
  9. a few curry leaves
Preparation:
  1. Boil cubed pooshnikai (or chow-chow or any other gourd) with just enough water to barely cover them, until they are tender. Remove from heat.
  2. Grind coconut and green chillies along with some salt. 
  3. Mix this ground paste in yogurt.
  4. Add this to to the cooked pooshnikai and mix well.
  5. Heat coconut oil in a pan. When hot, splutter mustard seeds, add cumin seeds and curry leaves. Add this tadka/garnish to the kootu and give a final stir.


Serve as a side-dish to rice or rotis.